When it comes to setting up an eCommerce website, the possibilities are many. However, generally speaking, you can decide on one of two choices.
- You can get a ready-made template from the various website solution vendors;
- You can build your website from ground up.
Naturally, the second option is the superior route. But you might feel intimidated by the ground-up phrase.
We are here to tell you there is nothing to be worried about. With WordPress and its huge market of plugins and themes, created to be as user-friendly as possible, you can create your own eCommerce website in a matter of hours.
You don’t need to have any knowledge of coding and most of the time you can configure your website with drag-and-drop functions or simple form filling.
Using WooCommerce is the first solution that comes to mind for an eCommerce website. It is a plugin that gives you all the necessary templates you will need for your shop.
Although working with WooCommerce is easy, it can be a bit time-consuming and restrictive when it comes to customization.
This is where ShopPress by Climax Themes comes into play.
Basic WooCommerce Shop Page
Once you have WooCommerce installed, you can check out the pages/templates it has created on your website. In this article, we want to take a look at the Shop page.
The shop page is where you display your products for users to see and search through.
The problem here is that WooCommerce doesn’t have many options to customize this page.
Therefore, you will need to rely on your theme or page builders to customize it.
Does My WordPress Theme Affect the Customization Process?
Of course, it does. All professional WordPress themes such as Astra, Divi, or Kata have their shop pages.
To see how they look, simply activate the theme and view the shop page. The differences are noticeable.
Here is how Twenty Twenty-Four Theme creates it’s shop page:

Now notice how different it looks compared to Astra shop page:

Let’s take a look at the shop page created by Kata:

As you can see, each theme has its own flavor added to your shop page.
But with ShopPress we want to take things a step further, and have total control over the look of this page, regardless of what theme we are using.
You might want to have a filter menu in the sidebar or a search bar on top.
You might want to edit the shop page title and use fun colors; all of these are possible with ShopPress and we are going to see how you can customize WooCommerce shop page.
How to Customize WooCommerce Shop Page Using ShopPress Shop Builder
ShopPress by Climax Themes is a comprehensive plugin for WooCommerce that enables you to edit and customize all aspects of your online shop, not just the shop page.
The biggest advantage that ShopPress has is the ease of use and straightforwardness.
With ShopPress you can build a custom WooCommerce shop page and make it stand out with minimal effort.
ShopPress uses Elementor page builder, arguably the best page builder out there, not to mention the most widely used one. We have created numerous special widgets in Elementor for your eCommerce website that are available in ShopPress.
But widgets are not everything, the Styler tool in ShopPress is essential to make the designs your own and distinguish your design language and philosophy from the rest, to create a memorable visual experience for your users, in line with your brand identity.
All of the changes and customizations are visible in real time so you can test out different things when editing your shop page to see what you like best.
Now let’s begin creating your WooCommerce shop page.
Enabling Shop Page Template in Woo Templates
After installing and activating WooCommerce, start adding your products and their features. Once you have a few products, you can start customizing the shop page.
Alternatively, you can use dummy products offered by WooCommerce to populate your shop page and do your customizations first.
Once you have ShopPress installed and activated, you will see a ShopPress item added to your WordPress dashboard.

Here is your ShopPress dashboard. As you can see, there are few options and everything is contained within here. So, you don’t need to do a lot of menu-hopping to figure things out.
Now, to activate the shop builder, click on Woo Templates then you’ll see the Shop icon, turn it on so the Config button lights up and then click on the Config button.

Now we are going to customize the shop page.
Selecting the Default Shop Page Template
Once you’ve clicked on the Config button, you will be taken to this page to create a template for your shop page.
Here you can find a default template called Shop.
Keep in mind that this template is empty. So, if you enable this template and save changes, your shop page will be empty.

By clicking on Add New, you can create a new template for your shop page.
Suppose that you want to have a usual WooCommerce shop page for most of the year, but a special shop page for the Christmas season.
Here you can create two different templates, and activate the one you want to have at that particular point in time.
After clicking on Add New, you will need to name your new template and then save.
A new entry will be added to this page with the three buttons that give you the options to delete, edit and turn the template on/off.
Keep in mind that you can only have one template active at a time. You cannot activate two different templates at the same time.
How to Edit WooCommerce Shop Page Using ShopPress & Elementor
Whichever template you’ve decided to edit, after clicking on the Edit button, you will be taken to this page:

As you can see, you have the title of your website at the top left, in our case, it’s a test website, you have your Elementor widget menu on the left and the blank page in the middle.
Here you can drag and drop widgets on the page, and create your shop page.
You can click on the + sign to add a new container. For example, adding a two-column container allows you to display two widgets next to each other.
As you can see, it’s all very easy and straightforward.
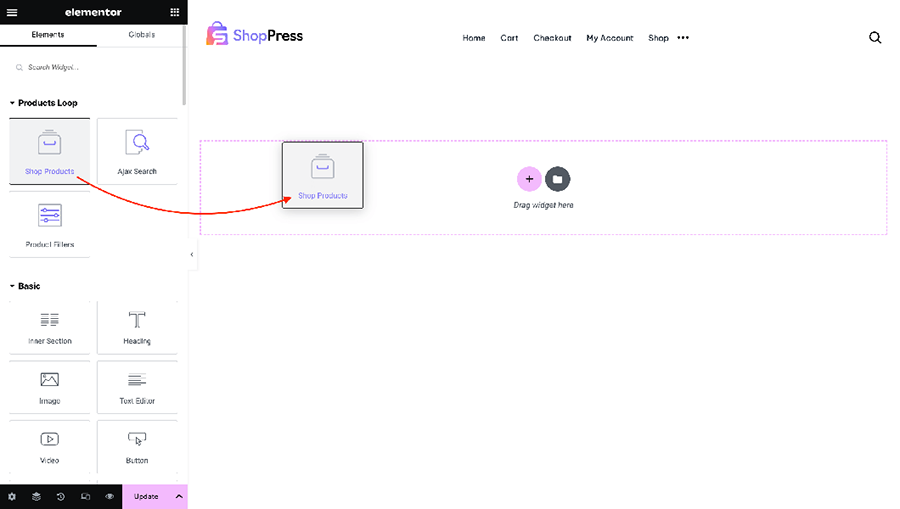
Displaying Products Using Shop Products Widget (Shop Products Widget)
Once you have the containers selected, or you can use the default container that already exists on the page, from the menu on the left, you can drag and drop any widget you want onto the page.
This page is the shop page, naturally, the most important widget is Shop Products.

By adding the Shop Products widget to the page, you will be able to view all the products you have created in WooCommerce on the page.
Please note that you cannot edit the product loop from here, this is a place to customize the shop page. The product loop can be edited from a different menu in ShopPress.
Enabling Ajax Search
No WooCommerce shop page is complete without a search function. This is where the Ajax Search widget comes in.
Similar to Shop Products widget, you can drag and drop the Ajax Search widget onto the page, for example on the top, to enable a search feature for your users:

As you can see in the screenshot, I have the search widget selected on the page, and from the menu on the left, I can edit this widget.
But from this window, you can determine how many products the search will show, you can edit the text that is shown in the search field and you have advanced settings that you can see below to further customize the widget:

Product Filters Widget
Of course, every shop page needs a filter system as well, so that users can easily filter out the products they want and have an easier time finding what they want.
This is the third special widget for the shop page that you can find next to the Shop Products and Ajax Search widgets.
The best way to use this widget, in my opinion, is to place it on one side of the page.
To do this, simply create a two-column section like in the screenshot and place the Product Filter widget in one of the containers and the Shop Products widget in the other.

You can also further edit the widget via the options available in the menu on the left.
Apart from these three important widgets, there are a host of other ones that allow you to customize your WooCommerce shop page.
How to Make Your WooCommerce Shop Page Responsive
There is no understating of the importance of responsive design in modern web space. People are using a wide variety of devices to access the internet.
This means a wide variety of screens that you need to take into account when you are building a custom WooCommerce shop page.
With ShopPress we have made things easy for you.
On the menu at the bottom of the left sidebar, you can select Responsive Mode and a new bar will open on the top of the page.
Here you can select various screen sizes and manage how items are displayed for each screen size.

Using ShopPress “Styler” for In-Depth Customization of Your WooCommerce Shop Page

One of the unique and essential features included in ShopPress is its Styler tool.
It is a customization tool that enables you to edit the looks and style of your pages. Make sure to explore its various options and play around with it. I’m sure you’ll enjoy using the Styler.
Final Words
Your shop page is your shop’s window in a sense.
Therefore, it is of paramount importance to make it as pleasing as possible and create a nice and memorable experience for your users while browsing.
With ShopPress you have the option to build and customize the WooCommerce shop page with unlimited freedom.