The checkout page is the last step for businesses to turn their potential customers into buyers and plays an important role in conversion rate optimization.
That’s why customization goes a long way if you want to lower the chance of users canceling their payment at the very last step.
However, you might face some challenges as the customization possibilities for the checkout page is almost non-existent without the help of a third-party plugin.
Basic WooCommerce Checkout Page
Before we begin talking about third-party plugins let’s take a quick look at the default WooCommerce checkout page:

As you can see there needs to be lots of customizations made to improve this plain design.
From this point on the only tweaking option available is using custom CSS which might be quite unfamiliar to a typical business owner.
With that said, let’s see if your theme will play a role to make the default checkout page a bit more tolerable.
Does My WordPress Theme Affect the Customization Process?
Each major theme has its own design and presentation of the WooCommerce pages which does improve your Woo pages quite a bit.
However, you still won’t get any user-friendly customizations by simply installing a theme because most basic license plans don’t cover e-commerce pages or have very limited functionalities.
Here’s a list of default WooCommerce checkout pages after the installation of major themes to give you an idea of what you will be working with.
Astra Checkout Page:

Divi Checkout Page:

Kata Checkout Page:

How to Customize WooCommerce Checkout Page Using ShopPress Checkout Builder
If you are also dissatisfied with the default WooCommerce template, you are in the right place.
You can enable and edit each ShopPress component and build your desired WooCommerce checkout page.
You can also simply use static templates if the multistep checkout template or the Shopify style is what you are looking for.
Enabling Checkout Template in Settings -> Components
In order to enable the checkout page builder, first go to the WordPress dashboard menu and select ShopPress > Components.
Then, enable the Checkout component to activate the config button.

Once the config button is activated, you can then click on the button to enter the checkout component settings.

Static Templates
If you are looking for a more convenient approach with only a few customization possibilities you can simply go for the Multistep or Shopify styles. This method would suit you best if all you need is a slick design and don’t have much free time in your hands.
Multistep Checkout Template
As the name suggests the multi-step checkout process breaks down the entire checkout process into steps like payment information, Billing, Order and Shipping.
Shopify Style Checkout Template
If you are looking to change the checkout bottom menu, cart navigation, shipping step, etc. or include a logo in the checkout template, here’s how you can find all the tools and start editing.

How to Edit WooCommerce Checkout Page Using ShopPress & Elementor
ShopPress is the ultimate customization tool to customize WooCommerce page components as easily as possible and even use additional modules to create the perfect checkout page you want.

In order to get use of the ShopPress Checkout Builder, select Page Builder and add a new template, toggle on the template and save the changes.

Now you can click on “Edit” to open up the Elementor page builder and start editing.

We have gone through the customization widgets down below:
Order Notes (Additional Fields Widget)
With the help of this widget you can add more information to your checkout page if needed.

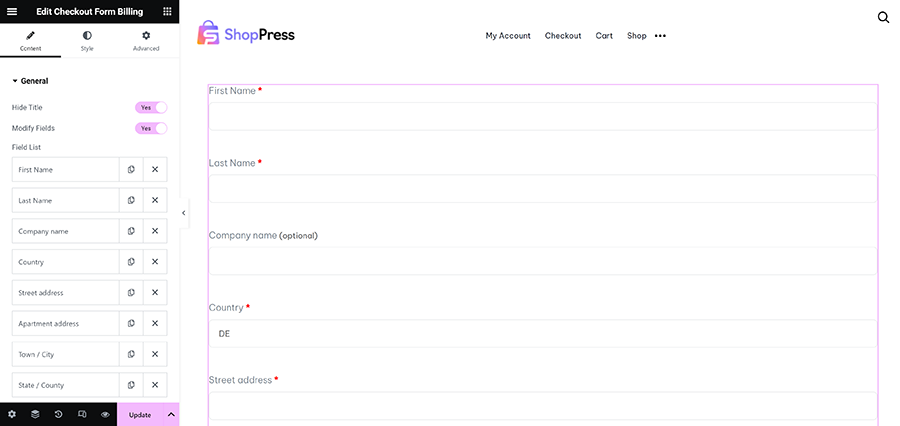
Billing Details (Form Billing Widget)
Here you can create a form for all the billing information like first name, last name, company name, address, etc.

As you can see in the screenshot, each field is equipped with multiple sections in order to set up the billing form.
Coupon Code Field (Coupon Form Widget)
Coupons increase revenue and encourage hesitant customers to make their purchase before the discount time expires.

Here you can edit the coupon code field as shown in the screenshot.
Checkout Login Form Widget
If you want to make sure the buyers are logged in before their purchase, this would be a pretty user-friendly spot to make sure the process will be as smooth as possible.
Order Summary (Order Review Widget)
It is common for users to check their orders for the very last time before they finalize their purchase.

Here’s how you can create an eye-catching order review by customizing the thumbnails, prices, header, footer or the product quantity.
Checkout Payment Methods (Payment Widget)
This widget allows users to choose their payment method and see their payment information.

This useful widget can also hide the payment method and policy description if needed.
Billing and Shipping Address (Form Billing Widget)
These two widgets are pretty similar to each other and allow you to edit all the billing and shipping fields.

How to Make Your WooCommerce Checkout Page Responsive
A responsive design can go a long way in user experience and SEO optimization and since ShopPress is powered by Elementor, you can adjust your ShopPress elements in a way that your page will work great on different screen sizes.
Using ShopPress “Styler” for In-Depth Customization of Your Checkout Page
One of the unique and essential features included in ShopPress is its Styler tool.
It is a customization tool that enables you to edit the looks and style of your pages.
Make sure to explore its various options and play around with it. I’m sure you’ll enjoy using the Styler.