In this article we are going to explain how you can set up a WooCommerce wishlist page for your online shop using the ShopPress plugin.
ShopPress by Climax Themes is a comprehensive and lightweight WooCommerce addon for Elementor that offers a full feature package for any ecommerce website, such as a shop builder, product comparison function, wishlist feature, quick view feature and much more.
How Can a Wishlist Help your WooCommerce Store
Wishlists are an important feature of any online shop. They make the shopping process easier and more pleasant for the customer.
Having a wishlist makes customers more likely to make a purchase because during the proverbial window shopping, they may not be ready to make a purchase.
But they can choose to add the item to their wishlist and have a list ready for them whenever they are ready to go ahead.
This way, they won’t forget about what they wanted to buy, plus, having a list waiting for them means they are more likely to go back to it to fulfill their wishes.

Adding Wishlist to your WooCommerce Shop Without a Plugin
The long and short of it is that it’s not possible.
This is one of those features that doesn’t come with WooCommerce but is absolutely essential as part of a successful ecommerce website.
Oftentimes website owners have to rely on third party plugins to get this functionality.
ShopPress intends to give you all you need in a single package so that you won’t have to buy several plugins to add different features to your website.
While you might need to get several addons to have a page builder, a wishlist, or a payment system, ShopPress gives you all of this and more.
How to Add Wishlist to WooCommerce Using ShopPress Wishlist Builder
After installing and activating ShopPress, a new page is automatically created for you called Wishlist.
But for now we don’t have anything to do with that.
First of all, we must activate and customize the Wishlist Module. To do that, from your WP dashboard go to ShopPress > Modules and enable Wishlist:

Once you enable Wishlist, the Config button lights up.
Before clicking that, save the changes using the green button on the top right.
Now, we can click on the Config button and start customizing our wishlist.
How to set up the WooCommerce Wishlist
After you click on the Config button you will be taken to this page.
Below we are going to go over all the different options and what they can do for you.

Selecting the Main WooCommerce Wishlist Page
The first option is the Wishlist Page. Here you can select a page to be your wishlist page.
By default, it is the new page that ShopPress creates for you, but you can create a different page yourself, then type that page’s name in the field and set it as your wishlist page.
Keep in mind if you change this page, then you need to hover over the question mark and copy the shortcode it shows on the page you have created.

How to Add Wishlists to User Account Dashboard
All shop websites give their users a dashboard area to manage their purchases and other things related to their account.
Normally you don’t have a link to the wishlist on that page.
But it is essential to have users’ wishlist display in their user dashboard and ShopPress has this option.
Simply enable the option Add Wishlist to MY Account Menu and a new menu item will be added to the My Account page.

Now when users enter their user area, they can easily go to the items they wish to listen and will see something like this.
Displaying Wishlist in Main Menu
Another important place to have the wishlist would be the navigation menu on the top of the website.
This way users can easily navigate to various pages on your WooCommerce shop and with a simple click go to their wishlist page.
This is very easy to do, you just need to enable the option Wishlist in Menu Module and you will have an item added to your menu that leads users to their wishlist page.
After enabling the option, from the dropdown menu, select a menu that you want to show the Wishlist in.

Not that if you have created a custom menu then you need to search its name in the field to find it.
Then you have the option to select one of two styles for your Wishlist menu, either display it as a drop down or a drawer.
How to Specify a Custom Icon and Label for Your WooCommerce Wishlist
The next three options allow you to either select an icon or upload one to be used for your wishlist button, customize the text for the buttons that add or remove items to and from your wishlist.

Change the Position of Add to Wishlist Button in Product and Shop Page
The next two options are very important.
You can use them to change the place of the Add to Wishlist button in your product loop and product page.

The options presented in these dropdowns are determined by WooCommerce.
So, they are pre-set. However, we have provided you with the chance to fully customize this location.
First, you need to select the option Customize using Elementor Widget from the dropdown.
After that, go to ShopPress > Woo Templates and either go to Product Single or Product Loop. There, you can edit the page with Elementor and use the Wishlist Widget wherever on the page you like.

As with everything, you will have access to our ShopPress’ powerful Styler tool to further customize the widget.
How to Customize WooCommerce Wishlist Page Using ShopPress & Elementor
To edit the actual page template, you need to navigate to ShopPress > Woo Templates and enable Wishlist then click on Config.

Here, you need to enable the template, or add a new template, and then click on Edit.
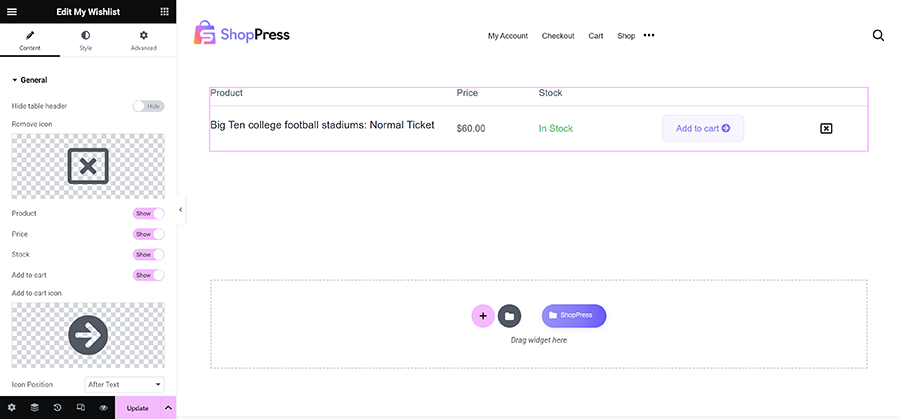
Once you click on Edit, you’ll be taken to the Elementor editor page to use all the widgets we have designed for you in ShopPress to create a wishlist page.
First and foremost, add the Wishlist Widget to the page.

Here you can use your own icons, select what is shown on the page and what is not, and where they are shown.
How to Make Your WooCommerce Wishlist Page Responsive
Responsive design is absolutely essential for modern websites.
People are using a variety of devices to connect to the internet and this means a variety of screen sizes.
We have you covered for that with ShopPress.
In the edit page section, click on this icon from the menu on the left:

This takes you to the responsive mode and you can view and edit your page in different sizes.
Using ShopPress Styler tool for Customizing Your Wishlist Page
ShopPress comes with its powerful Styler tool that is intended for full customization of widgets and pages that you create with it.
With Styler you can control colors, sizes, locations, icons and much more. You can let your creativity run free.
Final Word
Wishlist is just one of those important features that you just can’t do without. In this competitive market, you need to utilize a wide range of tools and offer a wide variety of options to edge yourself forward.
With ShopPress we have provided you with everything you need to thrive and they are very easily available and accessible to everyone even without coding knowledge.
So, take the reins and enjoy the ride.