
In this article, we will walk you through how to add a Woocommerce product.
Add a Woocommerce Product
First, you need to make sure that you have the Woocommerce plugin installed and activated. Then, From the WordPress dashboard menu, head over to Products > Add New.
Product Name
Enter the name of your product.
Product Description
Enter the description of your product.
Product Image
Add the feature image of your product.
Product Gallery
The Product Gallery meta box allows you to showcase all images that are associated with a product. To create a Product Gallery, you can use the same method as adding a Product Image, but this time, utilize the Product Gallery meta box instead.
Product Categories
Creating and managing product categories in WordPress is a fairly straightforward process. These categories function similarly to regular categories used in post creation. You have the freedom to create, modify, and choose them at any given time. Whether you are creating a new product or editing an existing one, you can easily edit the product category as well.
Product Tags
Managing and creating product tags in WordPress is a simple process. These tags function in a similar way to categories for posts. You have the liberty to create, modify, and select them whenever needed. Regardless of whether you are creating a new product or editing an existing one, the product tag can be edited without any difficulties.
Product Types
We can start adding products once we have configured stock management and set up attributes and categories. When adding a product, the first step is to determine its type.
Simple products – make up the majority of products that you may sell. They are shipped and do not have any options, like a book.
Grouped products – consist of a collection of related products that can be purchased individually, but all are simple products. For example, a set of six drinking glasses.
Virtual products – do not require shipping, such as services. When enabled, all shipping related fields are disabled, including shipping dimensions. In addition, a virtual product will not activate the shipping calculator in the cart and checkout.
Downloadable products – activate additional fields where you can provide a downloadable file. After the purchase is successful, a link to the downloadable file is sent to customers in the order notification email. This type of product is suitable for digital albums, PDF magazines, or photos.
External or Affiliate products – are listed and described on your website but are sold elsewhere.
Variable products have variations that may have different SKUs, prices, stock options, etc. For example, a t-shirt that is available in different colors and/or sizes.
Product Short Description
Include a summary that is usually placed alongside the product image on the listing page, while the detailed description can be found in the Product Description tab.
Adding a simple product
The process of adding a Simple product is quite similar to creating a post in WordPress. To begin, navigate to WooCommerce > Products > Add Product. You will then be presented with an interface that is familiar and intuitive, allowing you to get started right away. Simply enter a Title, Description, Categories, Tags, Images, and all the necessary information for your product. From there, you can move to the Product Data panel and choose downloadable (if it’s a digital product) or virtual (if it’s a service) if relevant.
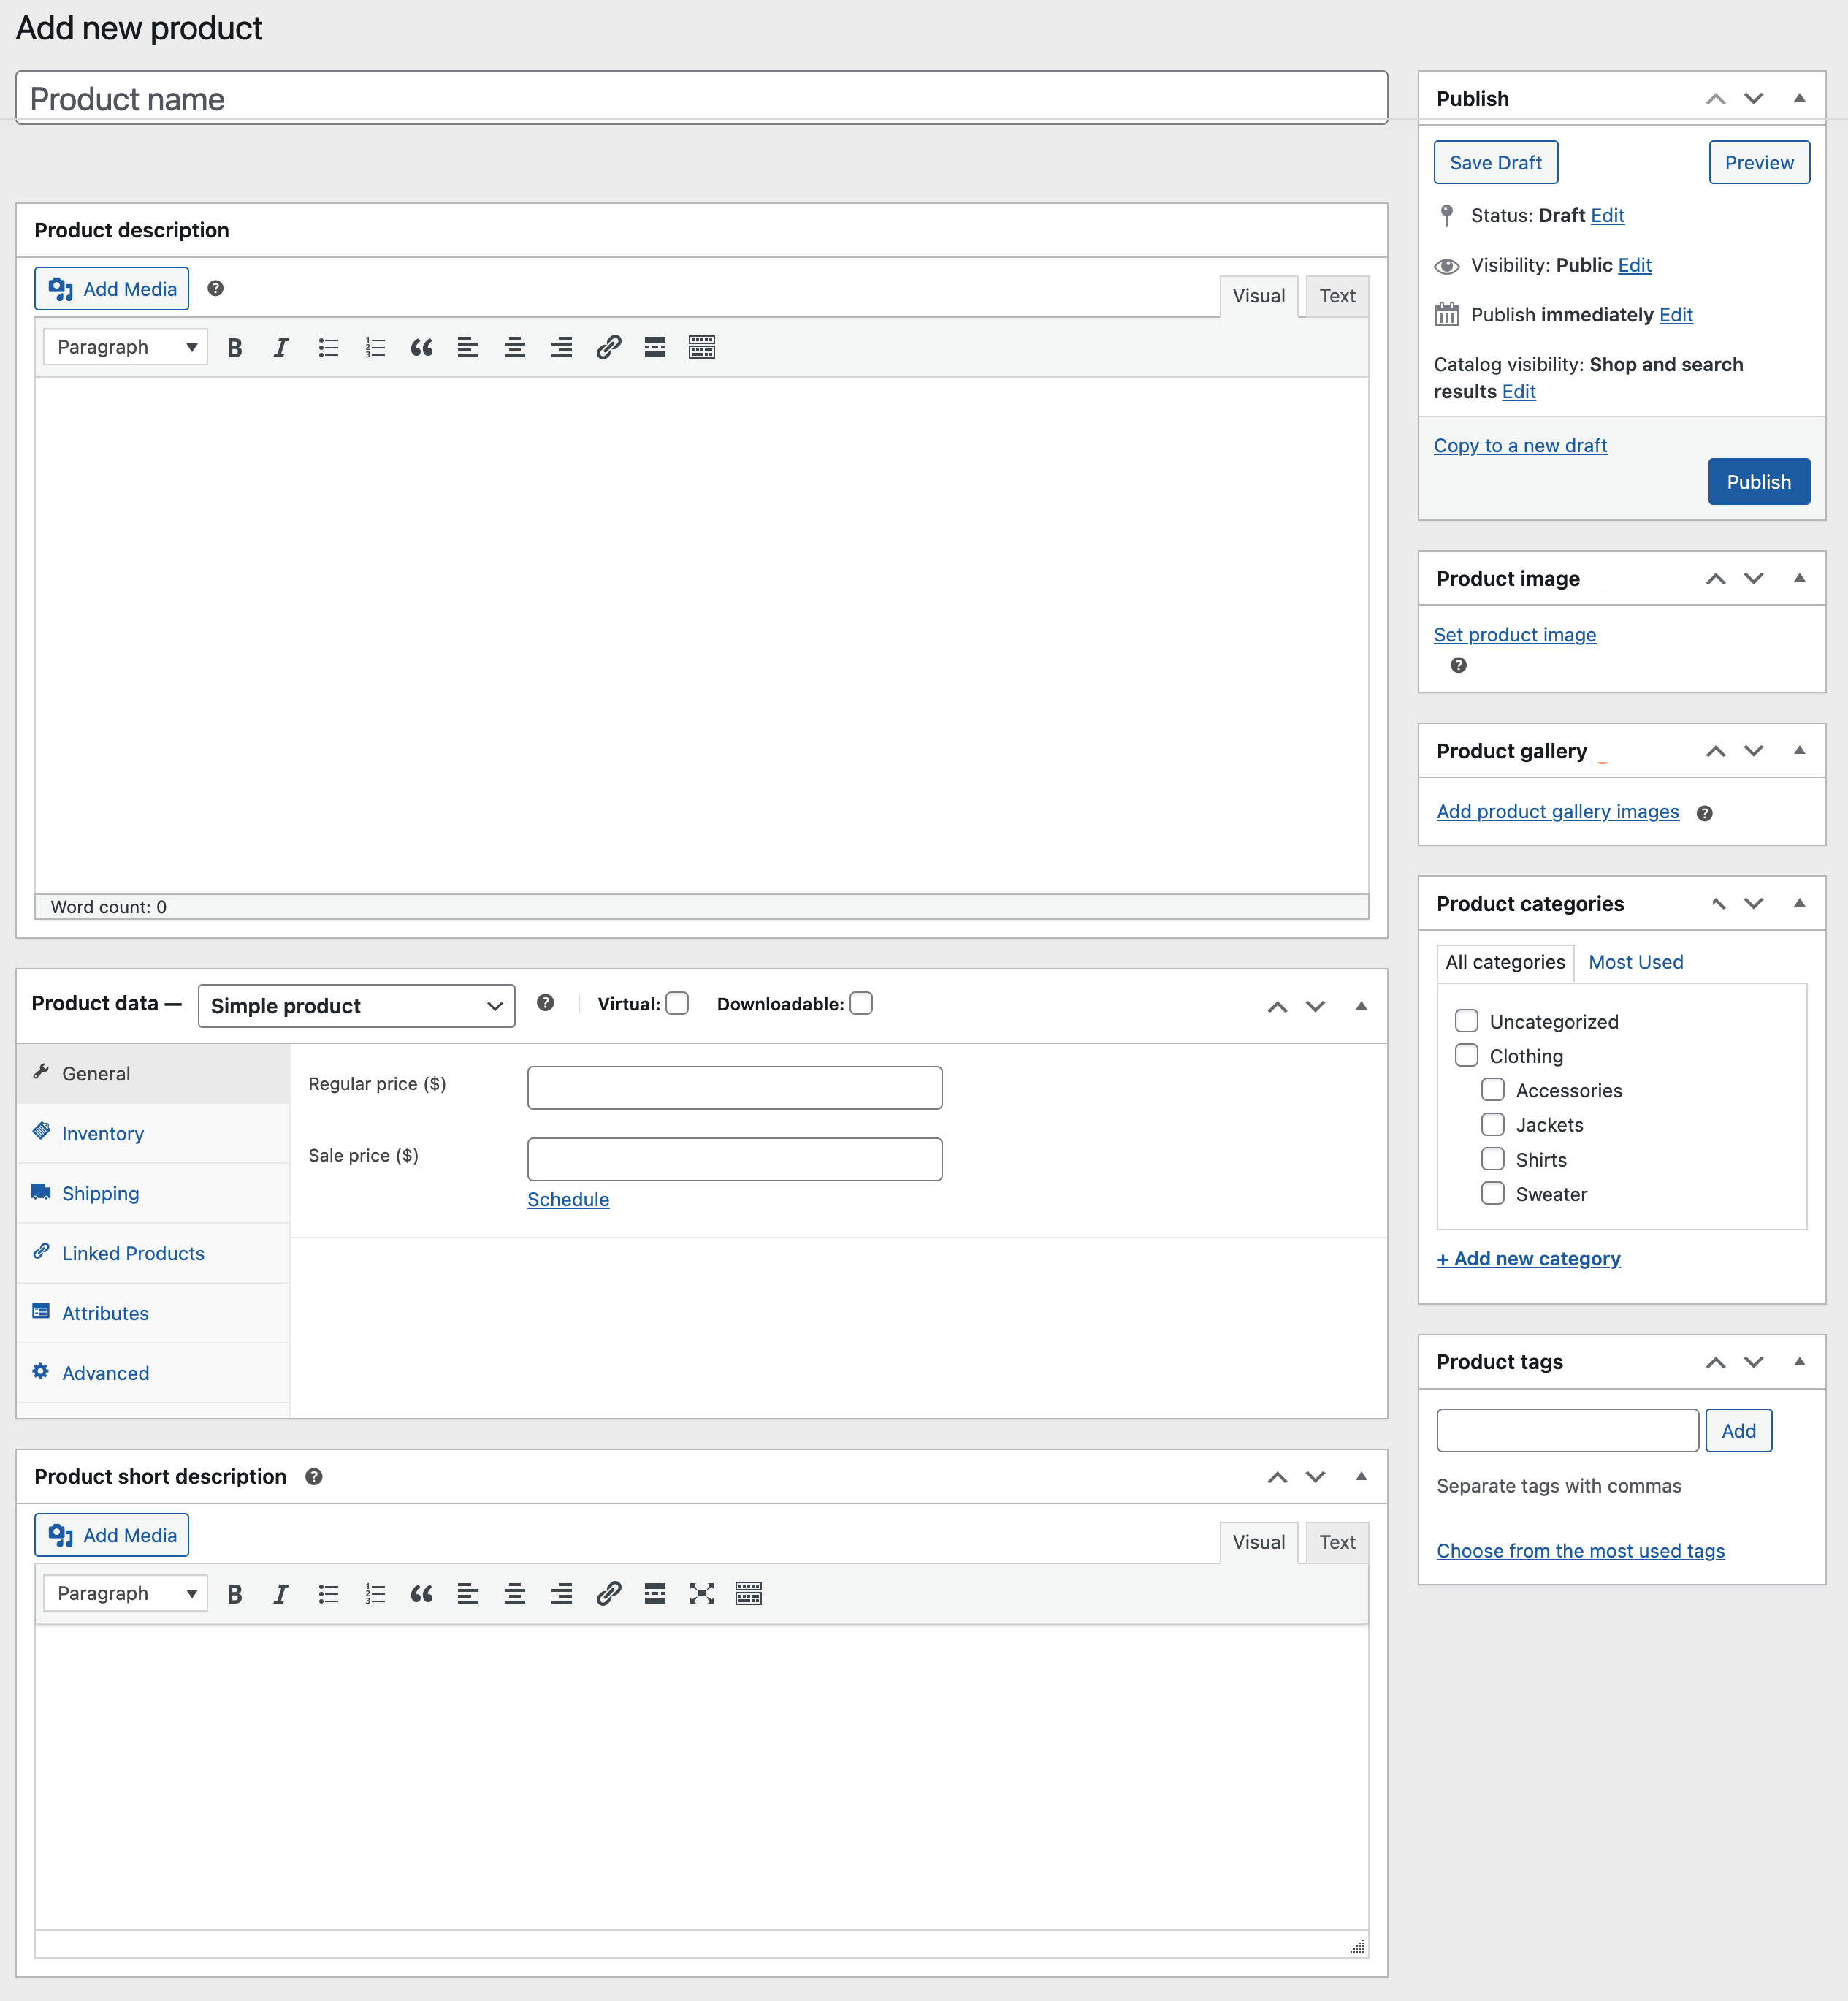
Product Data
The majority of significant data for your products are entered in the Product Data meta box.
General Section
The following information pertains to pricing and taxation:
- Regular Price: This refers to the normal price of a product.
- Sale Price: This is the discounted price of a product that can be scheduled for specific periods. The sale expires at 11:59 pm on the end date specified.
- Tax Status: This indicates whether a product is taxable, shipping only, or not taxable at all.
- Tax Class: This allows you to choose which tax class should be applied to a product.
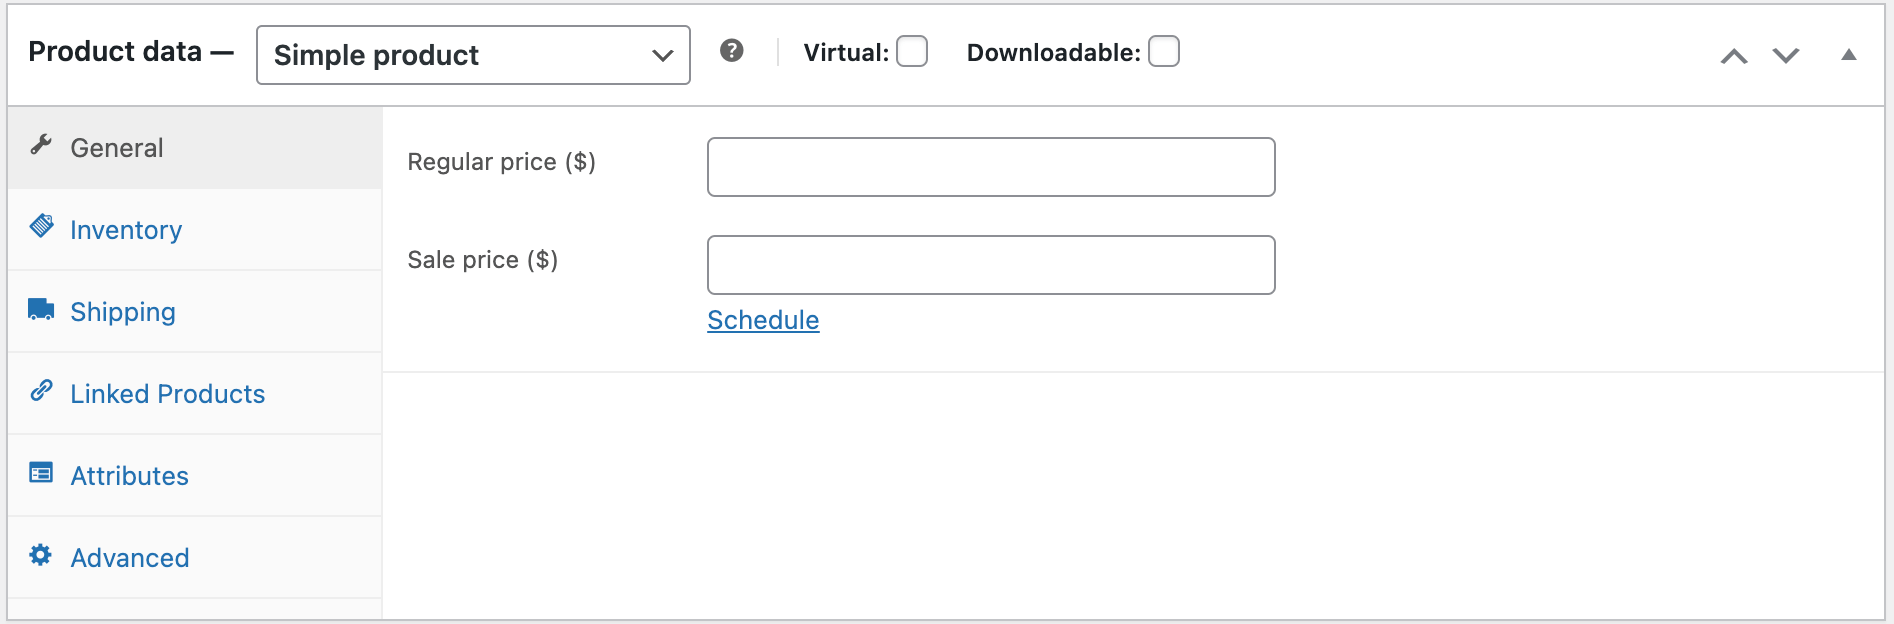
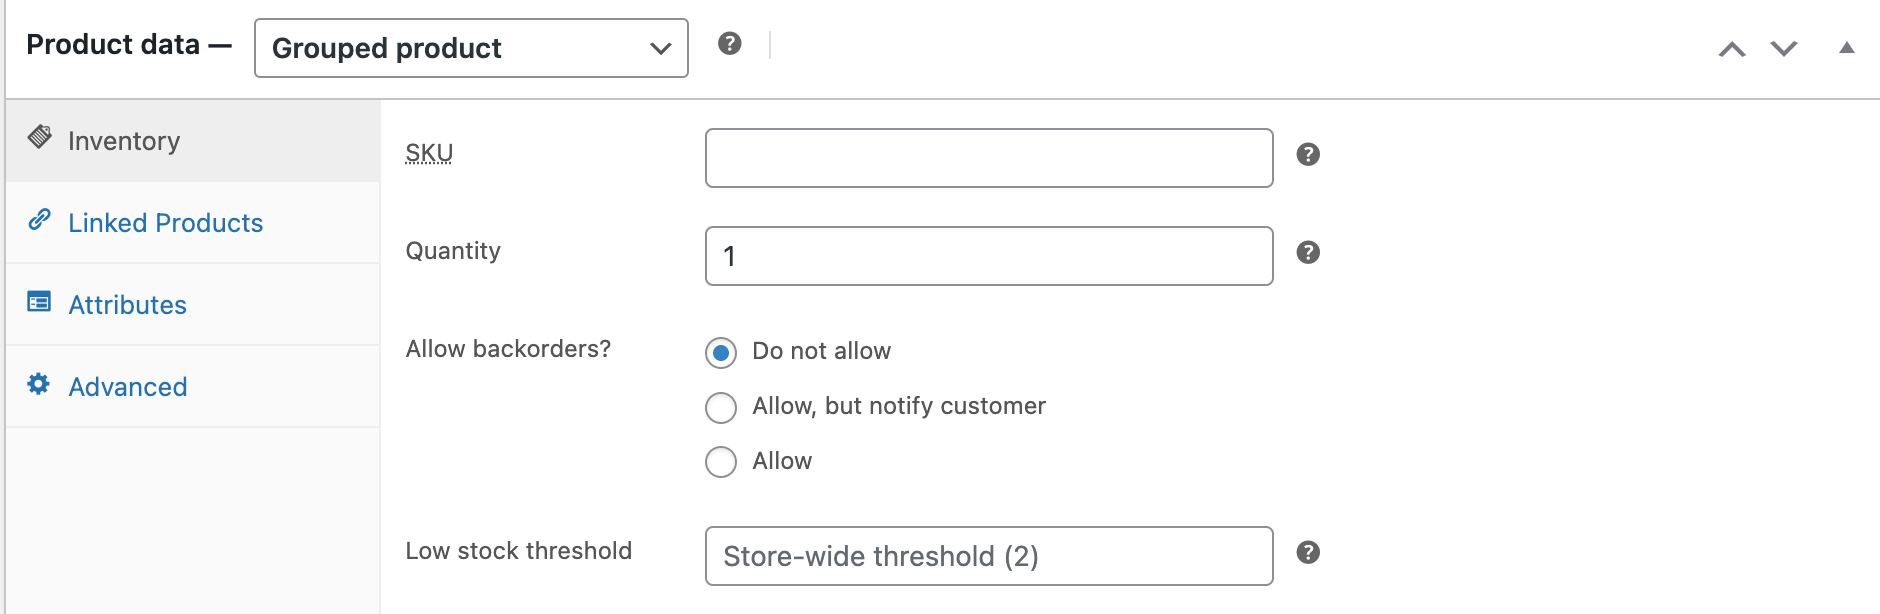
Inventory
You can use the inventory section to handle the stock for your product individually. You can decide whether to allow backorders and perform more functions. This feature allows you to sell products, and customers can add them to their cart to purchase them. To view the “Stock status” option in the Product Data Inventory box, you must select “Enable Stock Management” in Products Inventory Settings. If you disable stock management at the product level, you will be responsible for updating the stock status.
If you have enabled the Manage Stock Level feature, you have a few options available to you. Firstly, you can enter the quantity of stock you have and let WooCommerce take care of managing the inventory. The system will automatically update the Stock Status as either Stock, Out of Stock, or On Backorder depending on the current availability of the product.
You can also choose whether or not to allow backorders for the product. Additionally, you can set a low stock threshold and receive notifications when the stock level falls below a certain number.
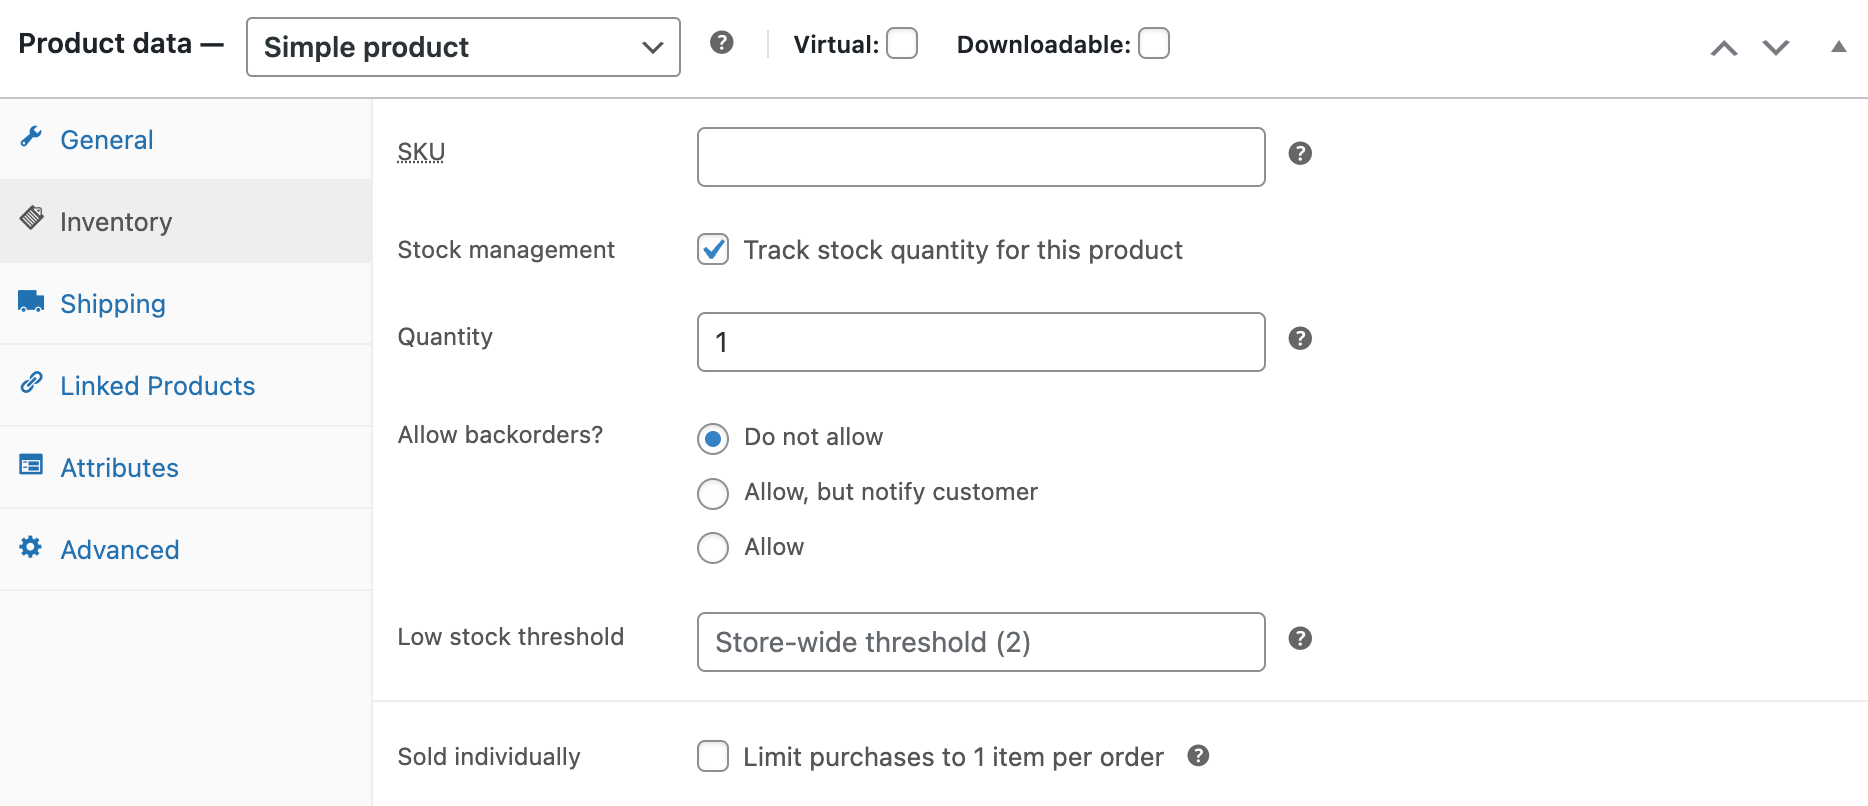
Shipping
Please keep in mind the following information: The weight of the item, its dimensions which include length, width, and height, and the shipping class which is used by specific shipping methods to categorize products with similar characteristics.
Linked Products
By utilizing up-sells and cross-sells, you can promote your products across your online store. You can add them by searching for a specific product and choosing it from the drop-down list.
Up-sells are showcased on the product details page. These are products that you may want to encourage customers to upgrade to, based on the product they are currently viewing. For instance, if a customer is looking at the coffee product listing page, you may want to present tea kettles on the same page as an up-sell.
Cross-sells are products that are displayed with the cart and are related to the contents of the customer’s cart. For example, if a customer adds a Nintendo DS to their cart, you may want to suggest that they also purchase a spare stylus when they arrive at the cart page.
Grouping is used to include a product as part of a grouped product. You can find more information about this feature in the Grouped Products section.
Attributes
On the Attributes tab, it is possible to assign product details. You will find a select box that contains the global attribute sets you created before (e.g., platform). You can learn more on how to manage product categories, tags, and attributes on the relevant page. Once you have selected an attribute from the select box, you can add it to the product and apply the terms associated with that attribute (e.g., Nintendo DS). If you wish to hide the attribute on the frontend, you can leave the Visible checkbox unchecked. Additionally, you can choose Custom product attribute from the select box and apply custom attributes, which will only be added at the product level and won’t be available in layered navigation or other products.

Advanced
You can add a note to be sent to the customer as an optional message after they make a purchase. There is an option to customize the position of this item in the menu ordering. You can choose to enable or disable customer reviews for this particular item.
Adding a grouped product
Creating a grouped product follows a similar process to that of a simple product. Grouped products serve as collections of other products within your store and therefore do not possess individual prices or stock numbers. To initiate the creation of a grouped product, navigate to the Product Type dropdown menu and select “Grouped Product”.
To commence the creation of your parent product, designate “Grouped” from the Product Type dropdown menu. Follow these steps:
- Access WooCommerce > Products > Add New.
- Input a Title for the Grouped product, such as “Back to School set”.
- Navigate to Product Data and opt for “Grouped” from the dropdown menu. Note that the price and several other fields will vanish, which is expected as a Grouped Product serves as a collection of ‘child products’, where this information is added.
- Publish the product.
However, it’s essential to note that the Grouped product remains an empty group at this stage. To populate this Grouped product, follow these steps:
- Create products and include them.
- Add existing child products.
You have the option to either first create simple products and subsequently add them to a Grouped product, or initially create a Grouped product and add simple products later, providing flexibility to include simple products in more than one Grouped product.
To add products to the Group, follow these steps:
- Go to WooCommerce > Products > Add New.
- Choose the Grouped product to which you want to add products.
- Scroll down to Product Data and navigate to Linked Products.
- Select “Grouped Products” and search for the product by typing.
- Click on the products you wish to include.
- Update the product.
You can rearrange the order of the Grouped Products by dragging and dropping. Once you update, the new order will be reflected on the product page.
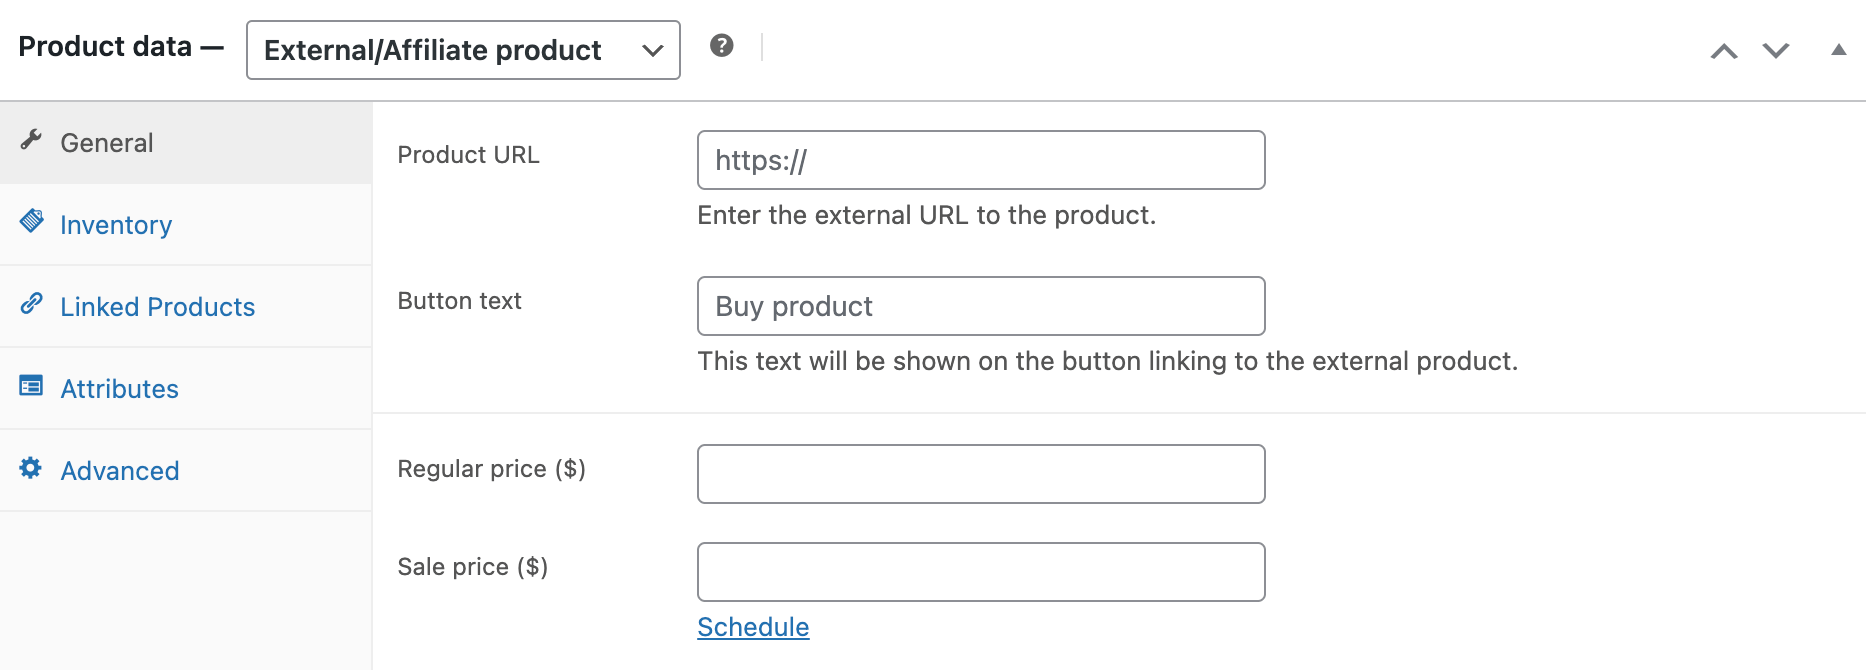
Adding an external/affiliate product
To select the ‘External/Affiliate’ from the product type dropdown, you will notice some changes in the Product data metabox. The shipping section will be removed from the left side, and two new fields will be added in the General section – the Product URL and Button text fields. The Product URL field is where users can buy the product, while the Button text field allows you to customize the Add to cart button text.
Adding a variable product
Creating variable products can be a bit challenging as compared to other product types. These products allow you to specify different versions of a single product and each version may have unique attributes such as SKU, price, or stock level.
You may refer to the Woocommerce Variable Product documentation for a comprehensive guide on how to create a product with variations.
