The purpose of intuitive Woocommerce Variation Swatches is to enhance the user experience by displaying product variants, colors, buttons, and photos.
Instead of the regular WooCommerce Variation Swatches styles, you can add a beautiful style for your swatches that displays all the variants appropriately next to each other.
Beginners Guide: What are WooCommerce Variation Swatches?
WooCommerce Variation Swatches provide an excellent solution for new clothing store owners who want to showcase their products of different types and colors in a visually appealing and user-friendly manner.
This feature allows customers to easily view and select product variations, such as sizes, styles, and colors, directly from the product page.
By implementing WooCommerce Variation Swatches, online shops like clothing store owners can enhance the shopping experience for their customers.
Instead of relying solely on dropdown menus or text-based options, the swatches display product attributes as attractive visual representations.
This allows shoppers to quickly and intuitively navigate through the available options, making their purchasing process smoother and more enjoyable.
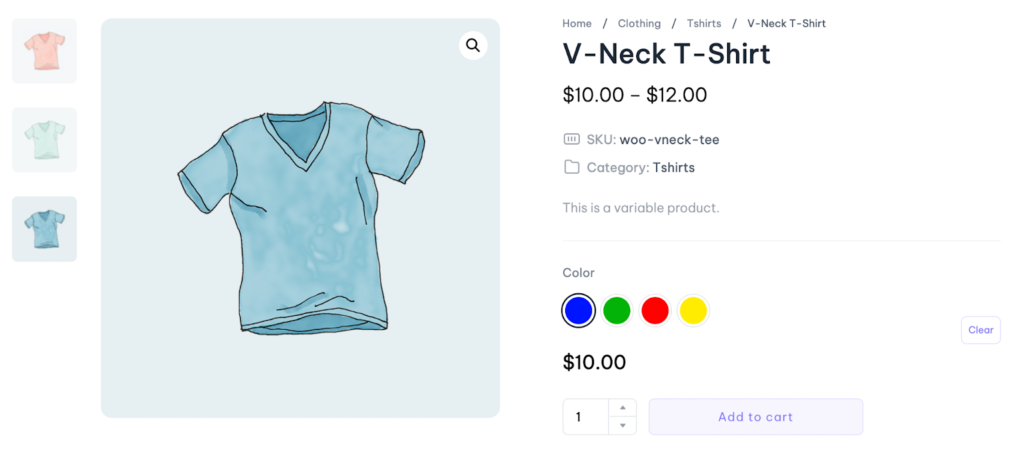
For instance, a clothing store owner can use WooCommerce Variation Swatches to showcase different colors and styles of a particular dress.
By displaying color options as swatches, customers can instantly see the available choices and make a selection based on their preferences.
This makes the product page look better and helps customers make decisions easier.
How to Use Woocommerce Variation Swatches?
To activate the WooCommerce Variation Swatches Option, please head to the ShopPress menu > Modules.
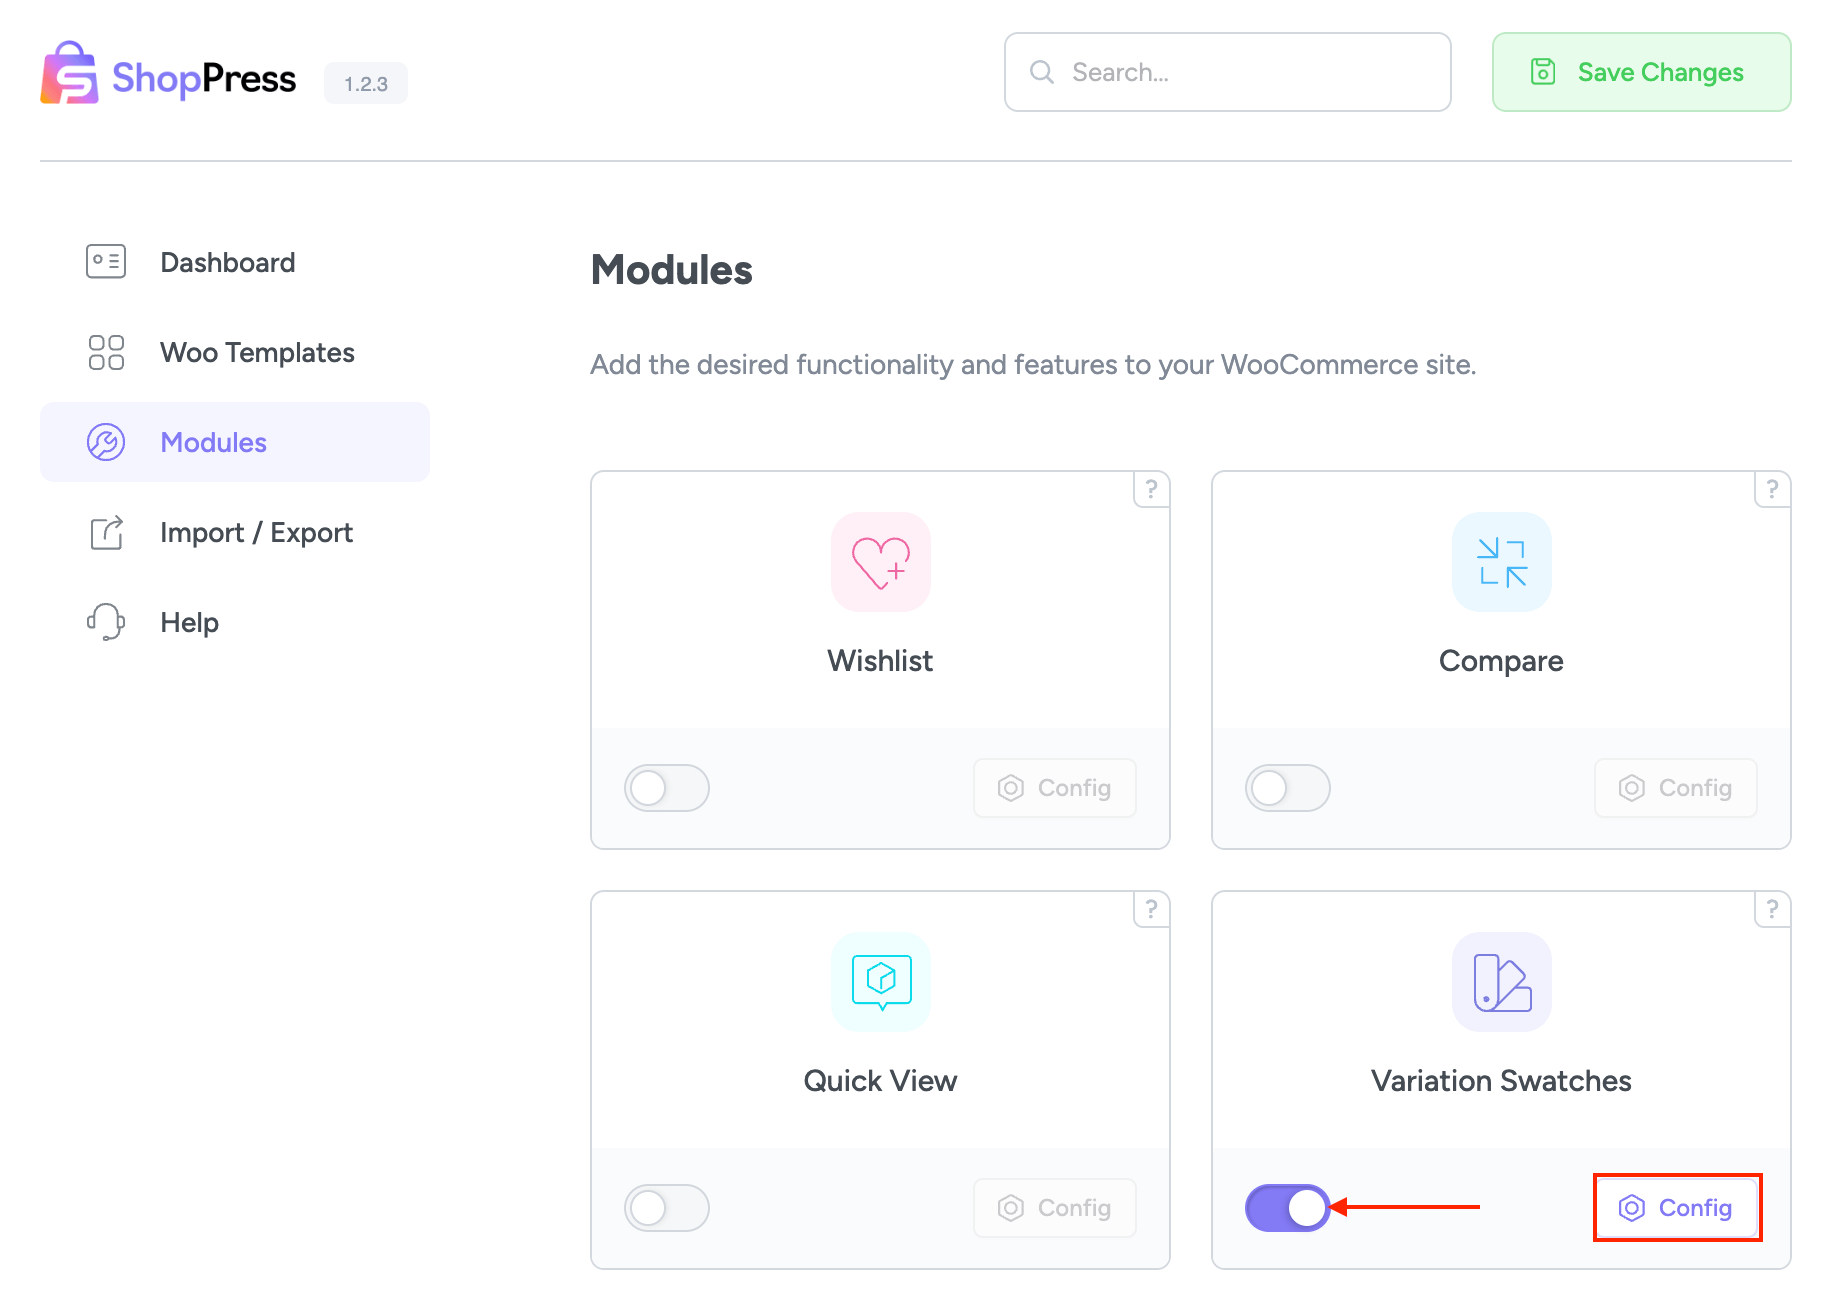
To adjust options based on your preferences, simply click on the Config button
Then, navigate to the product you want to apply the variation swatch on.
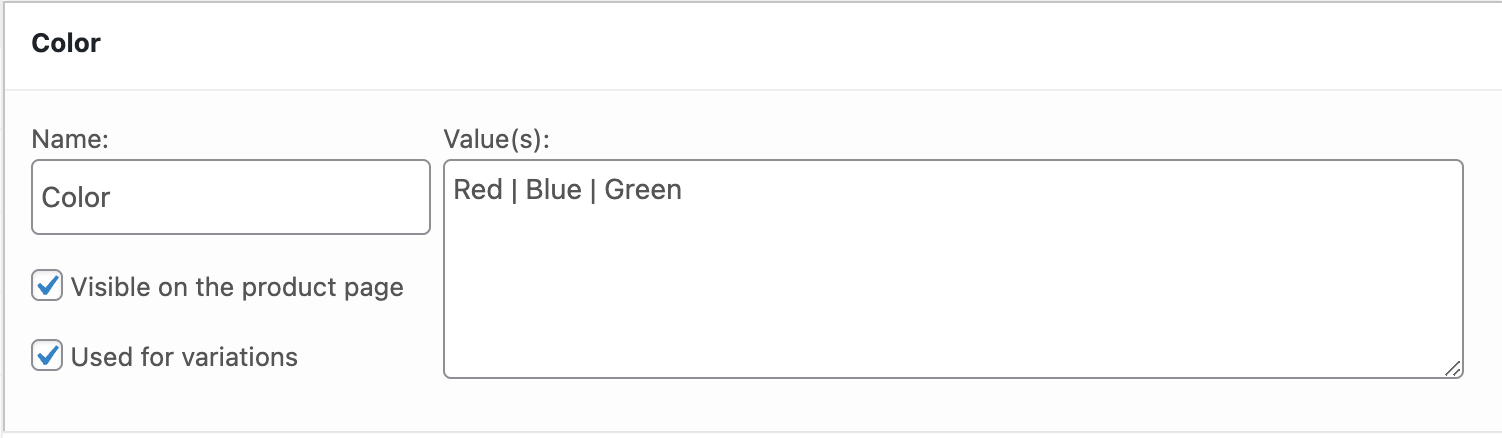
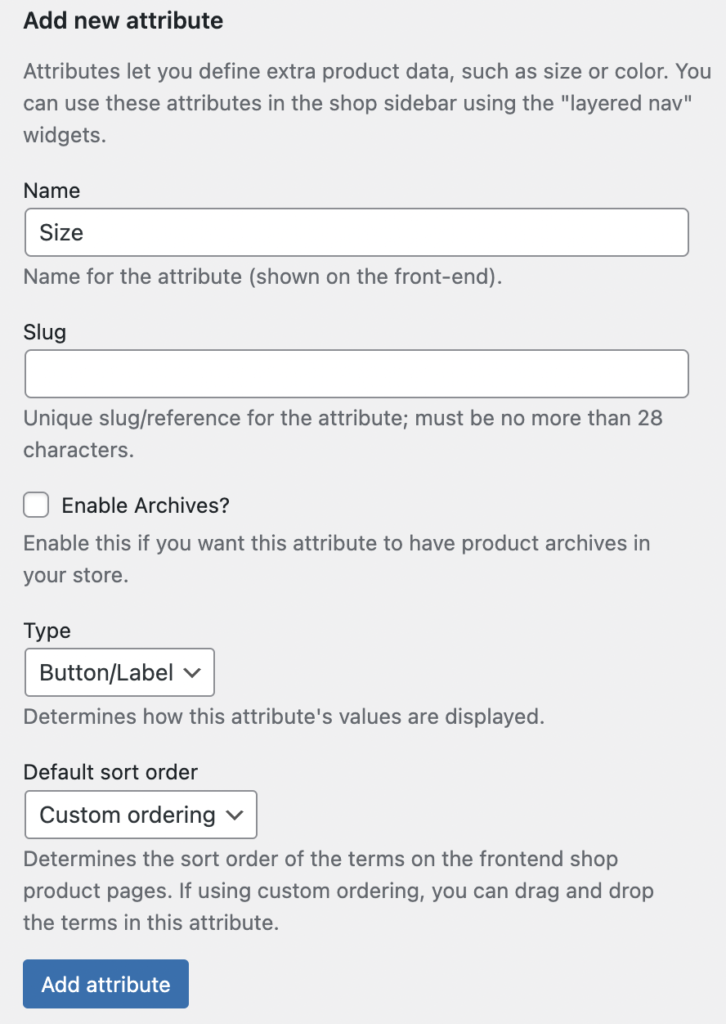
In the Attributes tab underneath the Product Data section, add a new attribute and set a new name and value for it.
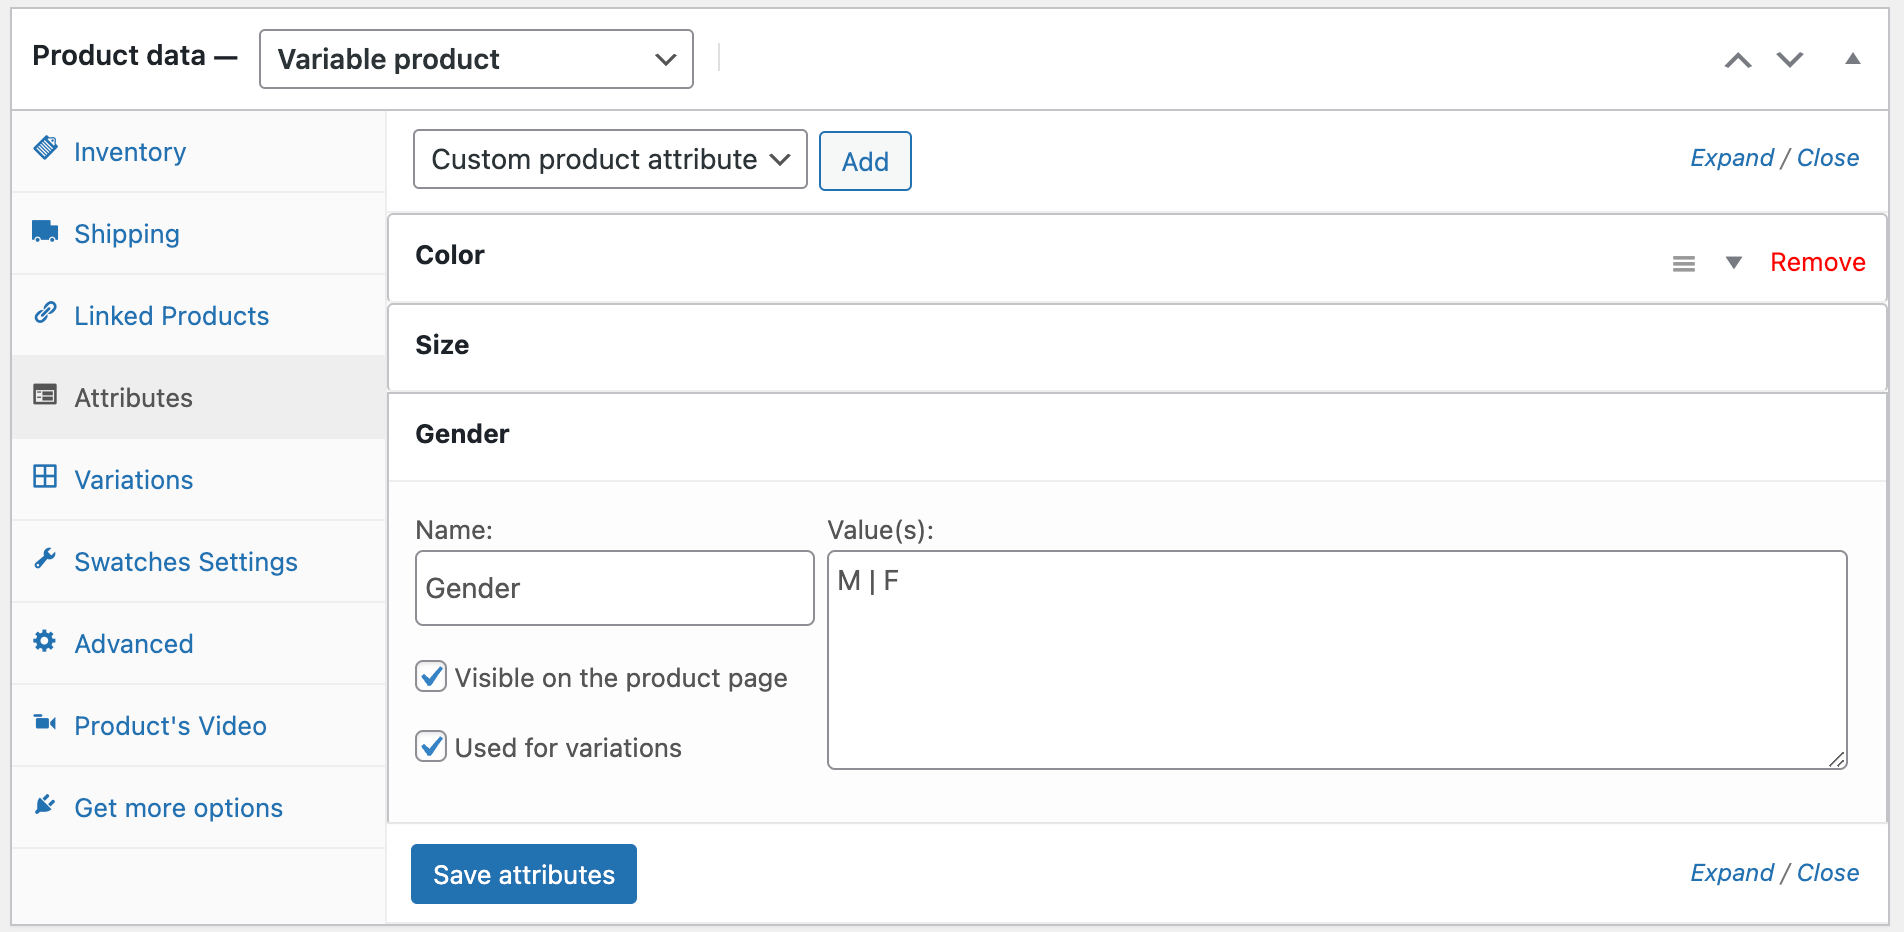
Note: Make sure to check the “Used for variations” option and Separate the values with the “|” sign.
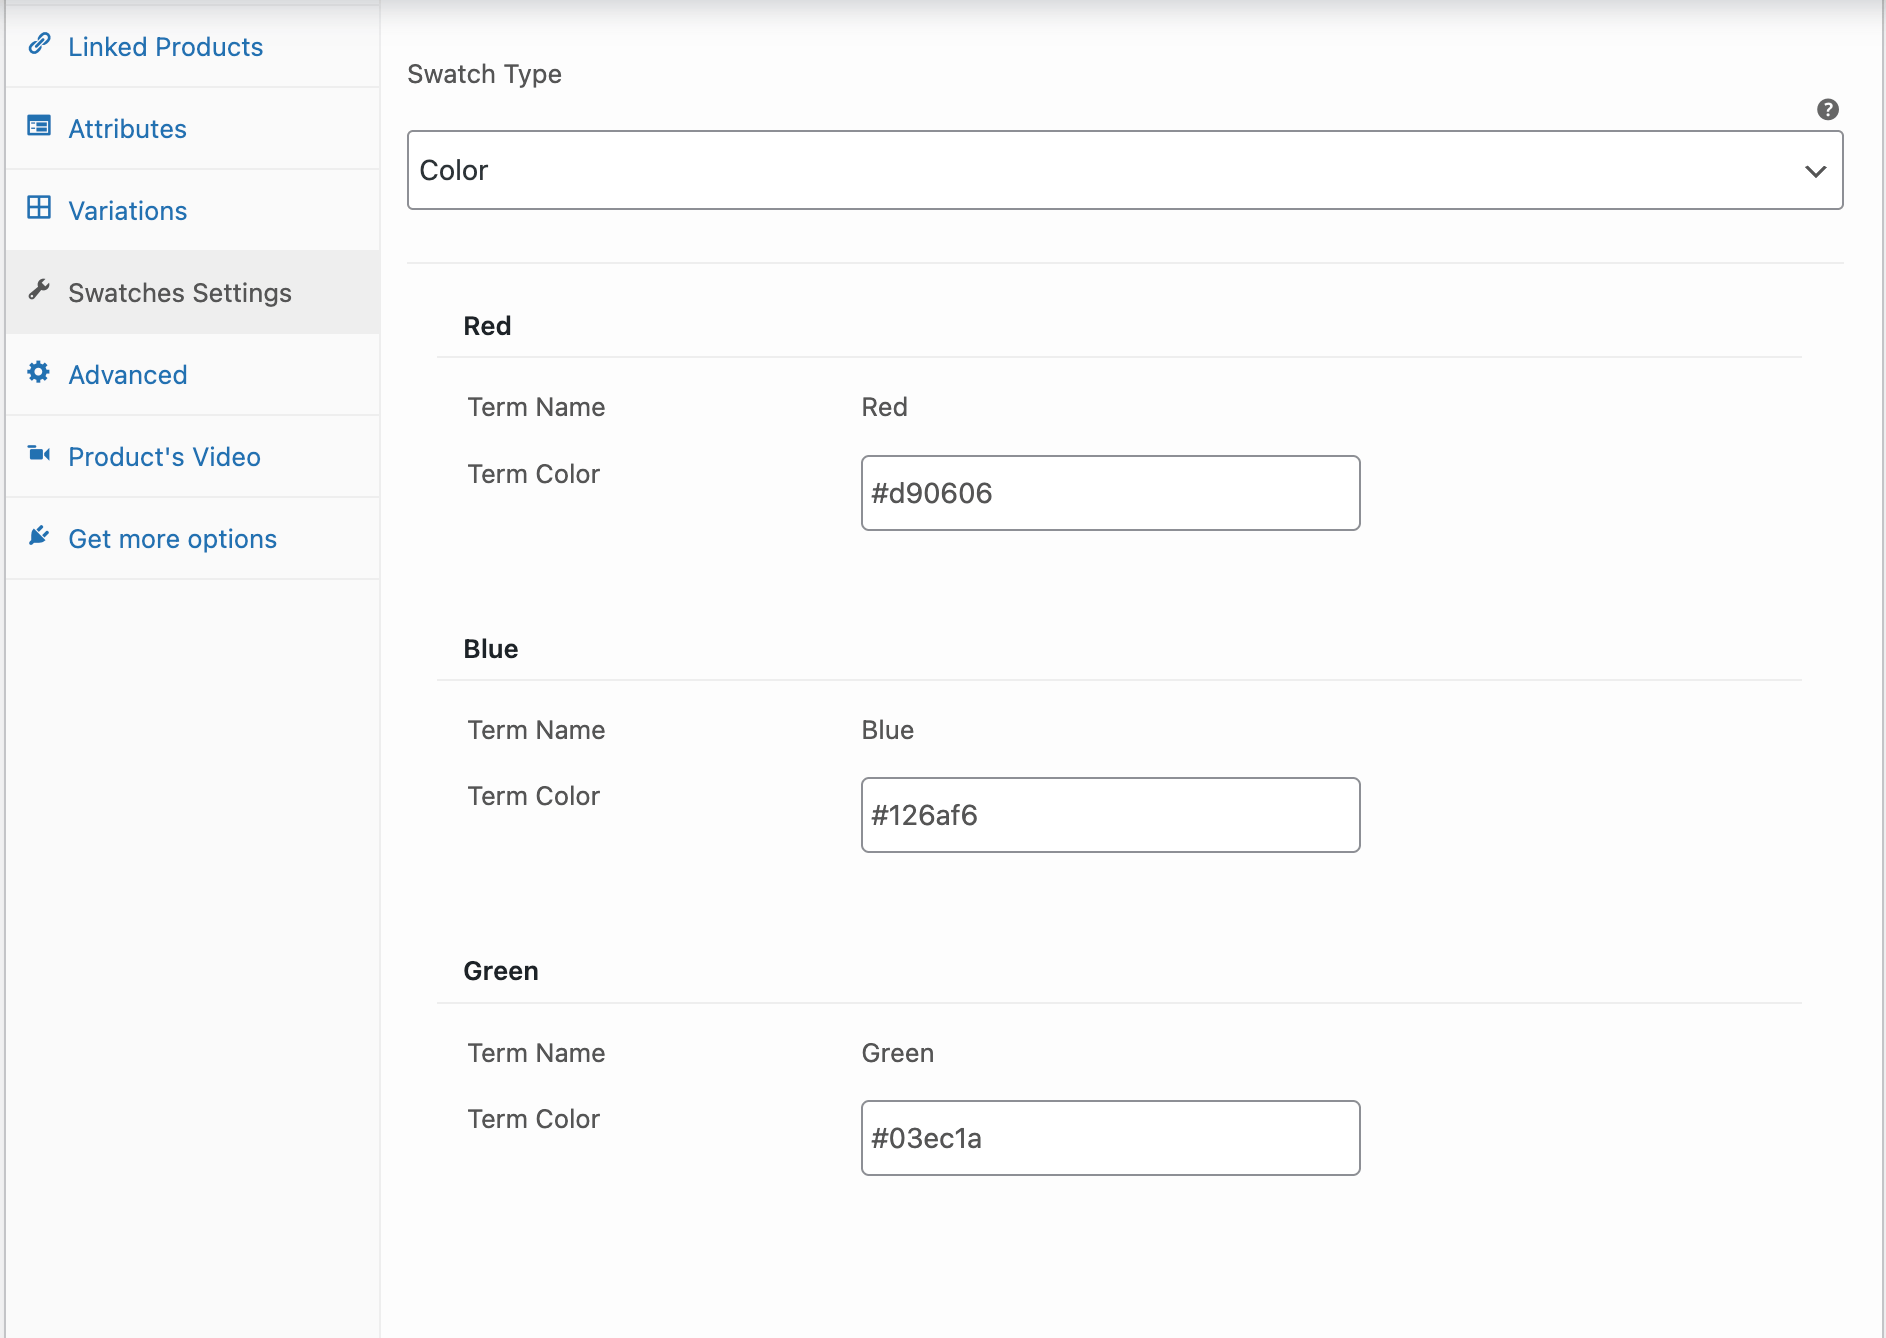
Now, navigate to Swatches Settings and choose the swatch type that you want to use for the product.
You can choose between Color, Button/Label, and Image.
WooCommerce Variation Swatches Color Type
You can use Variation Swatches Color Type to sell products with different colors.
First, add your preferred color in the Attributes tab.
Then, choose the color type, then you can specify the color for each product item.
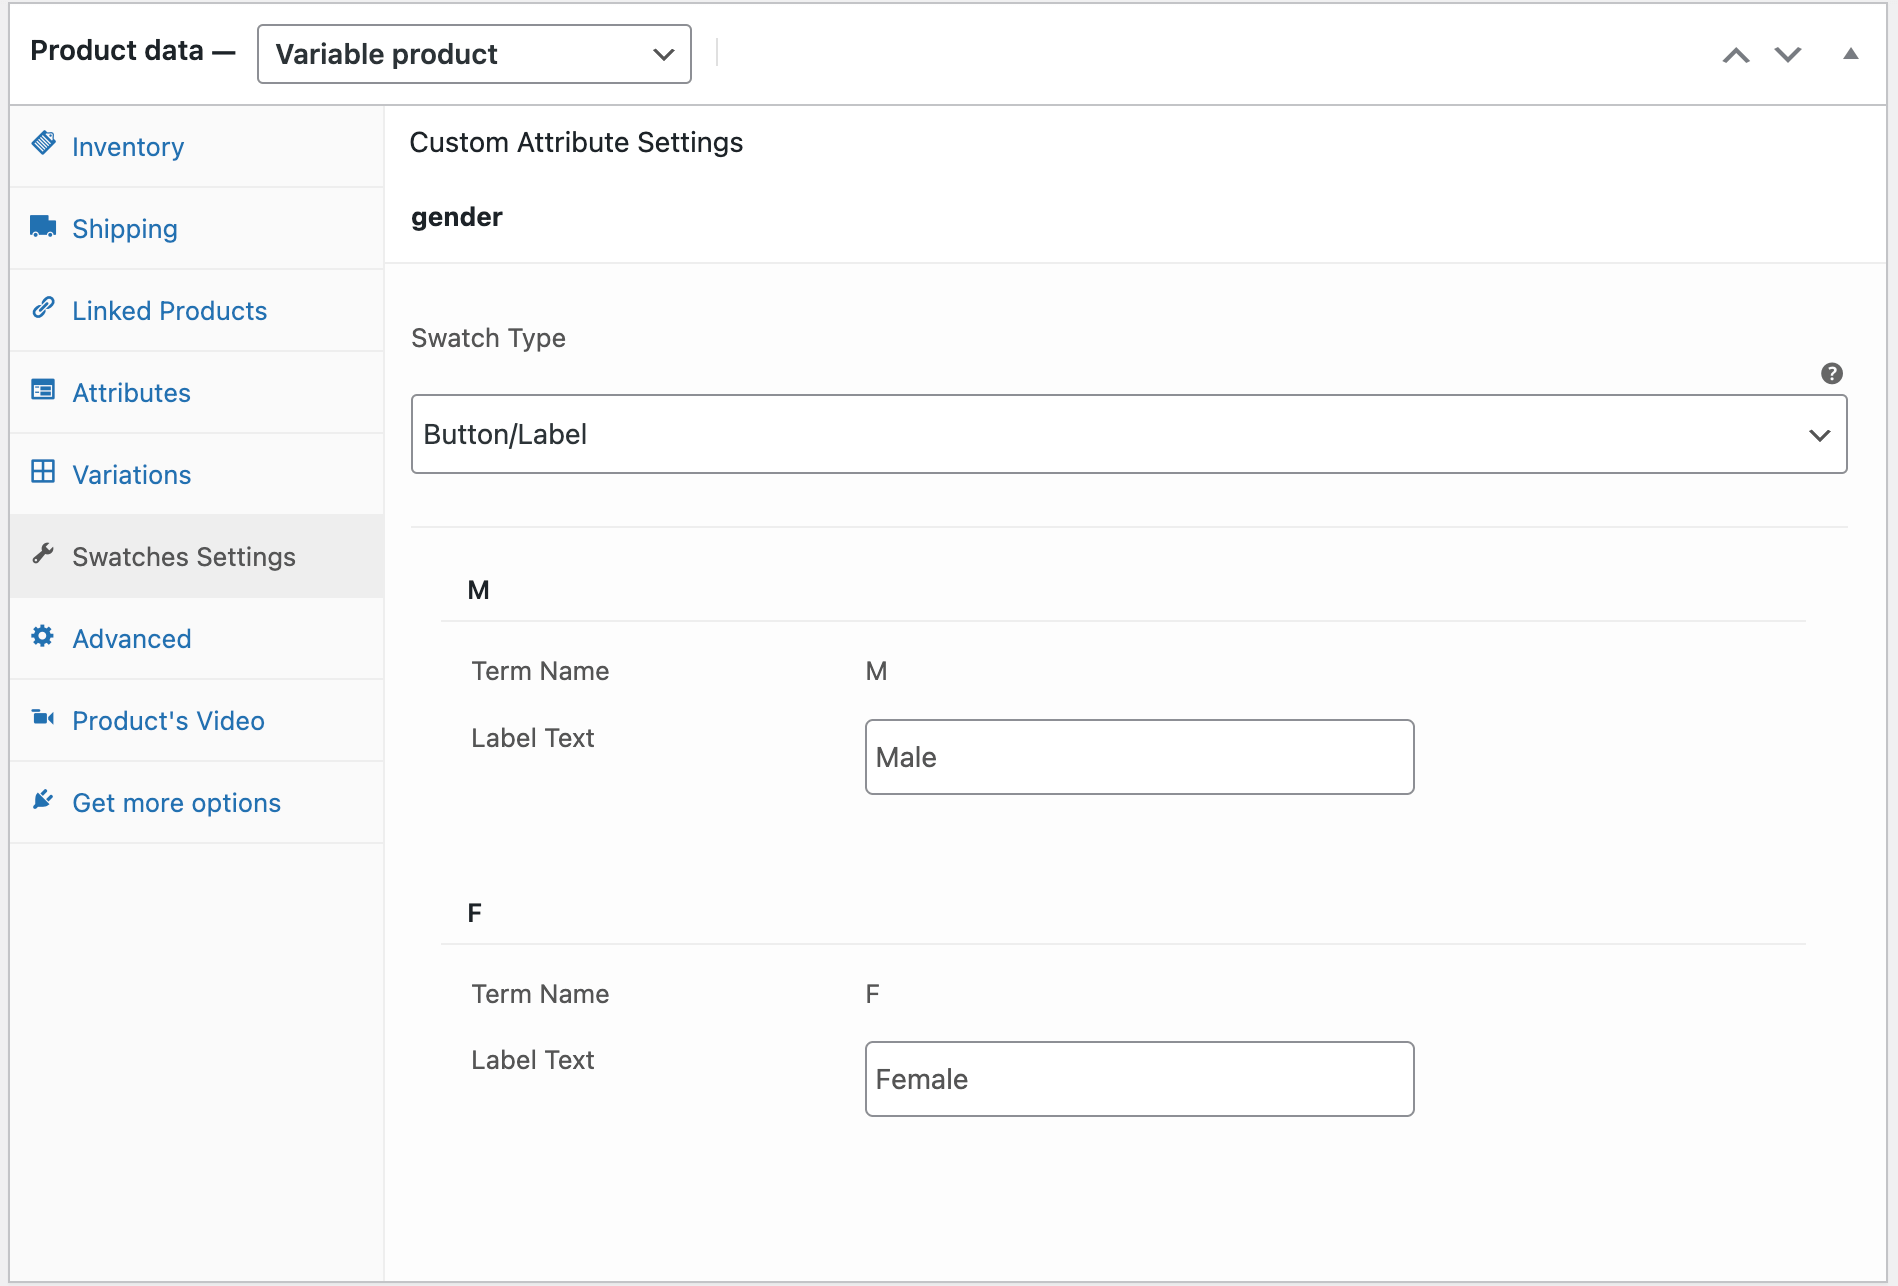
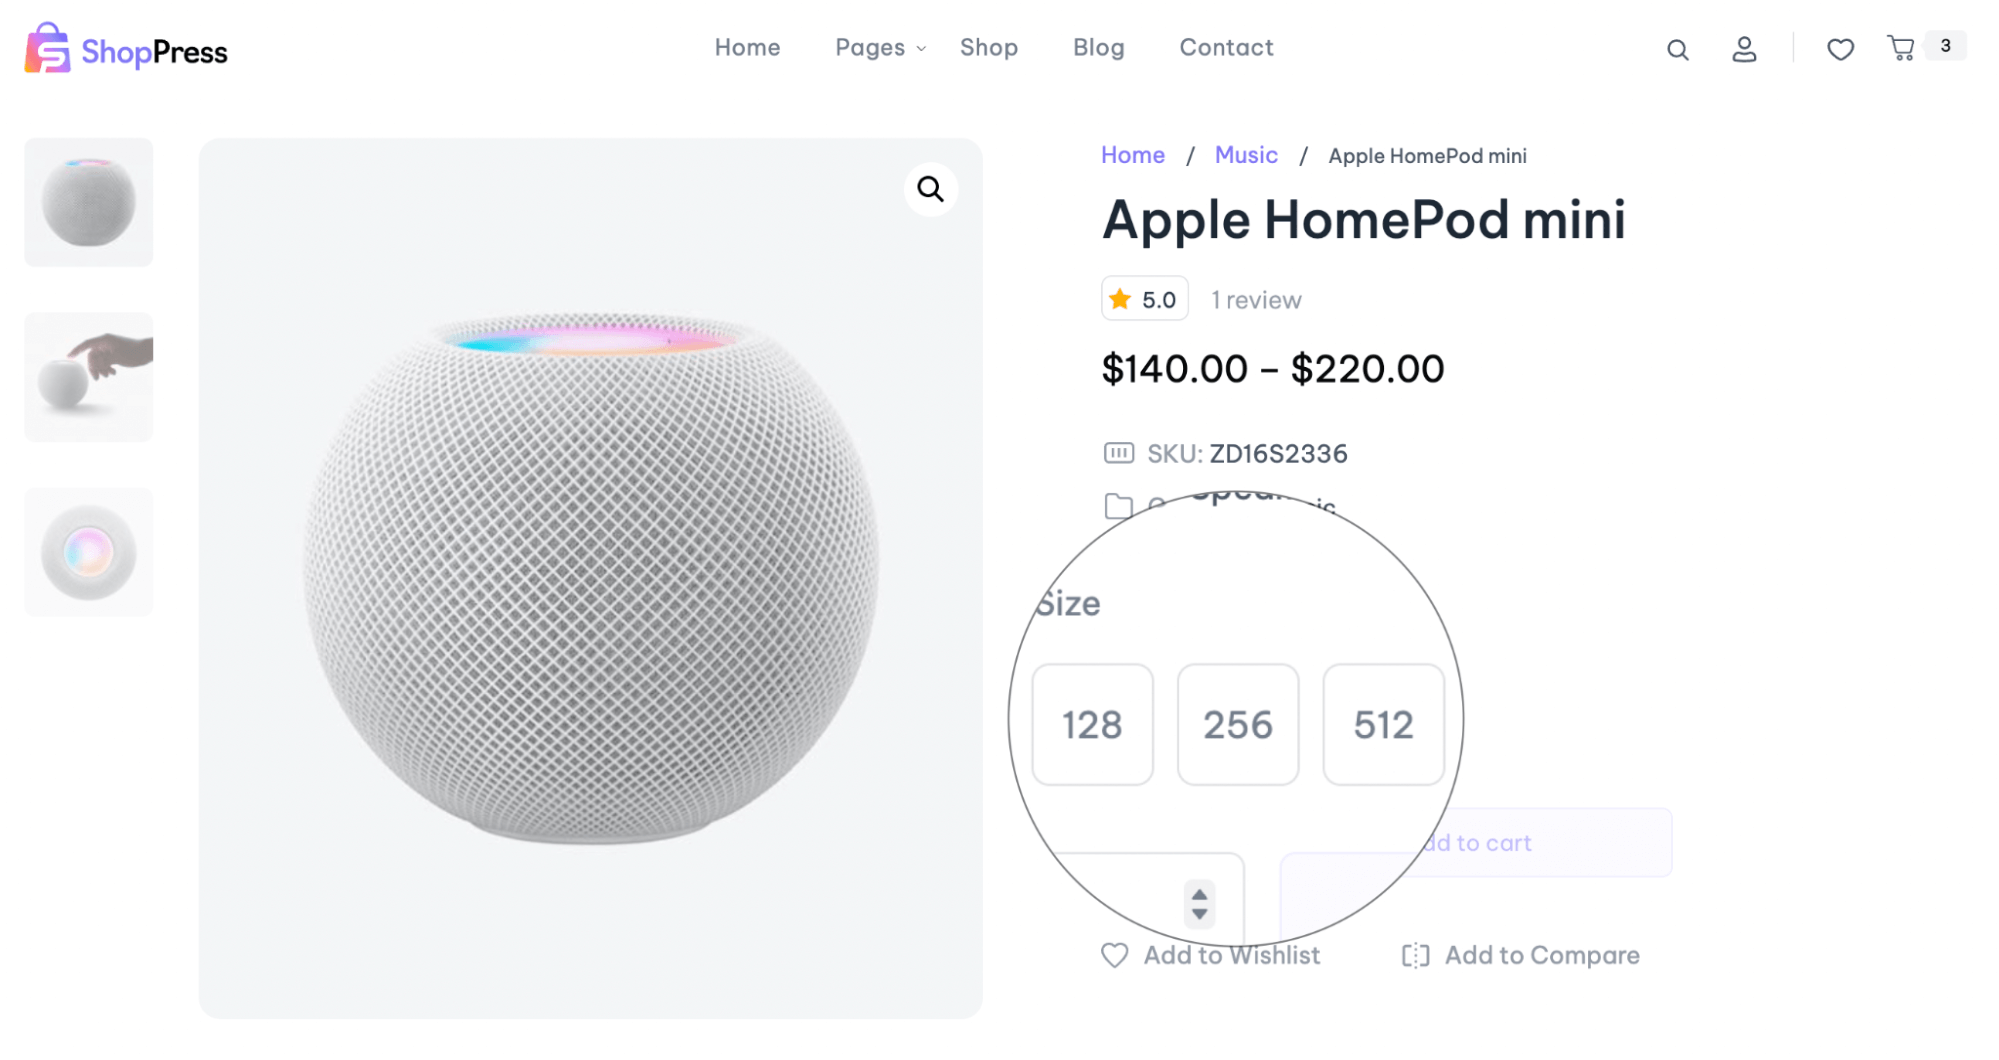
WooCommerce Variation Swatches Button/Label Type
You can show buttons or labels for your product variations by choosing the Button/Label type.
Choose the Button/Label swatch type and you can see the values you entered on the attribute tab will appear here.
Also, you can set the label text for each value.
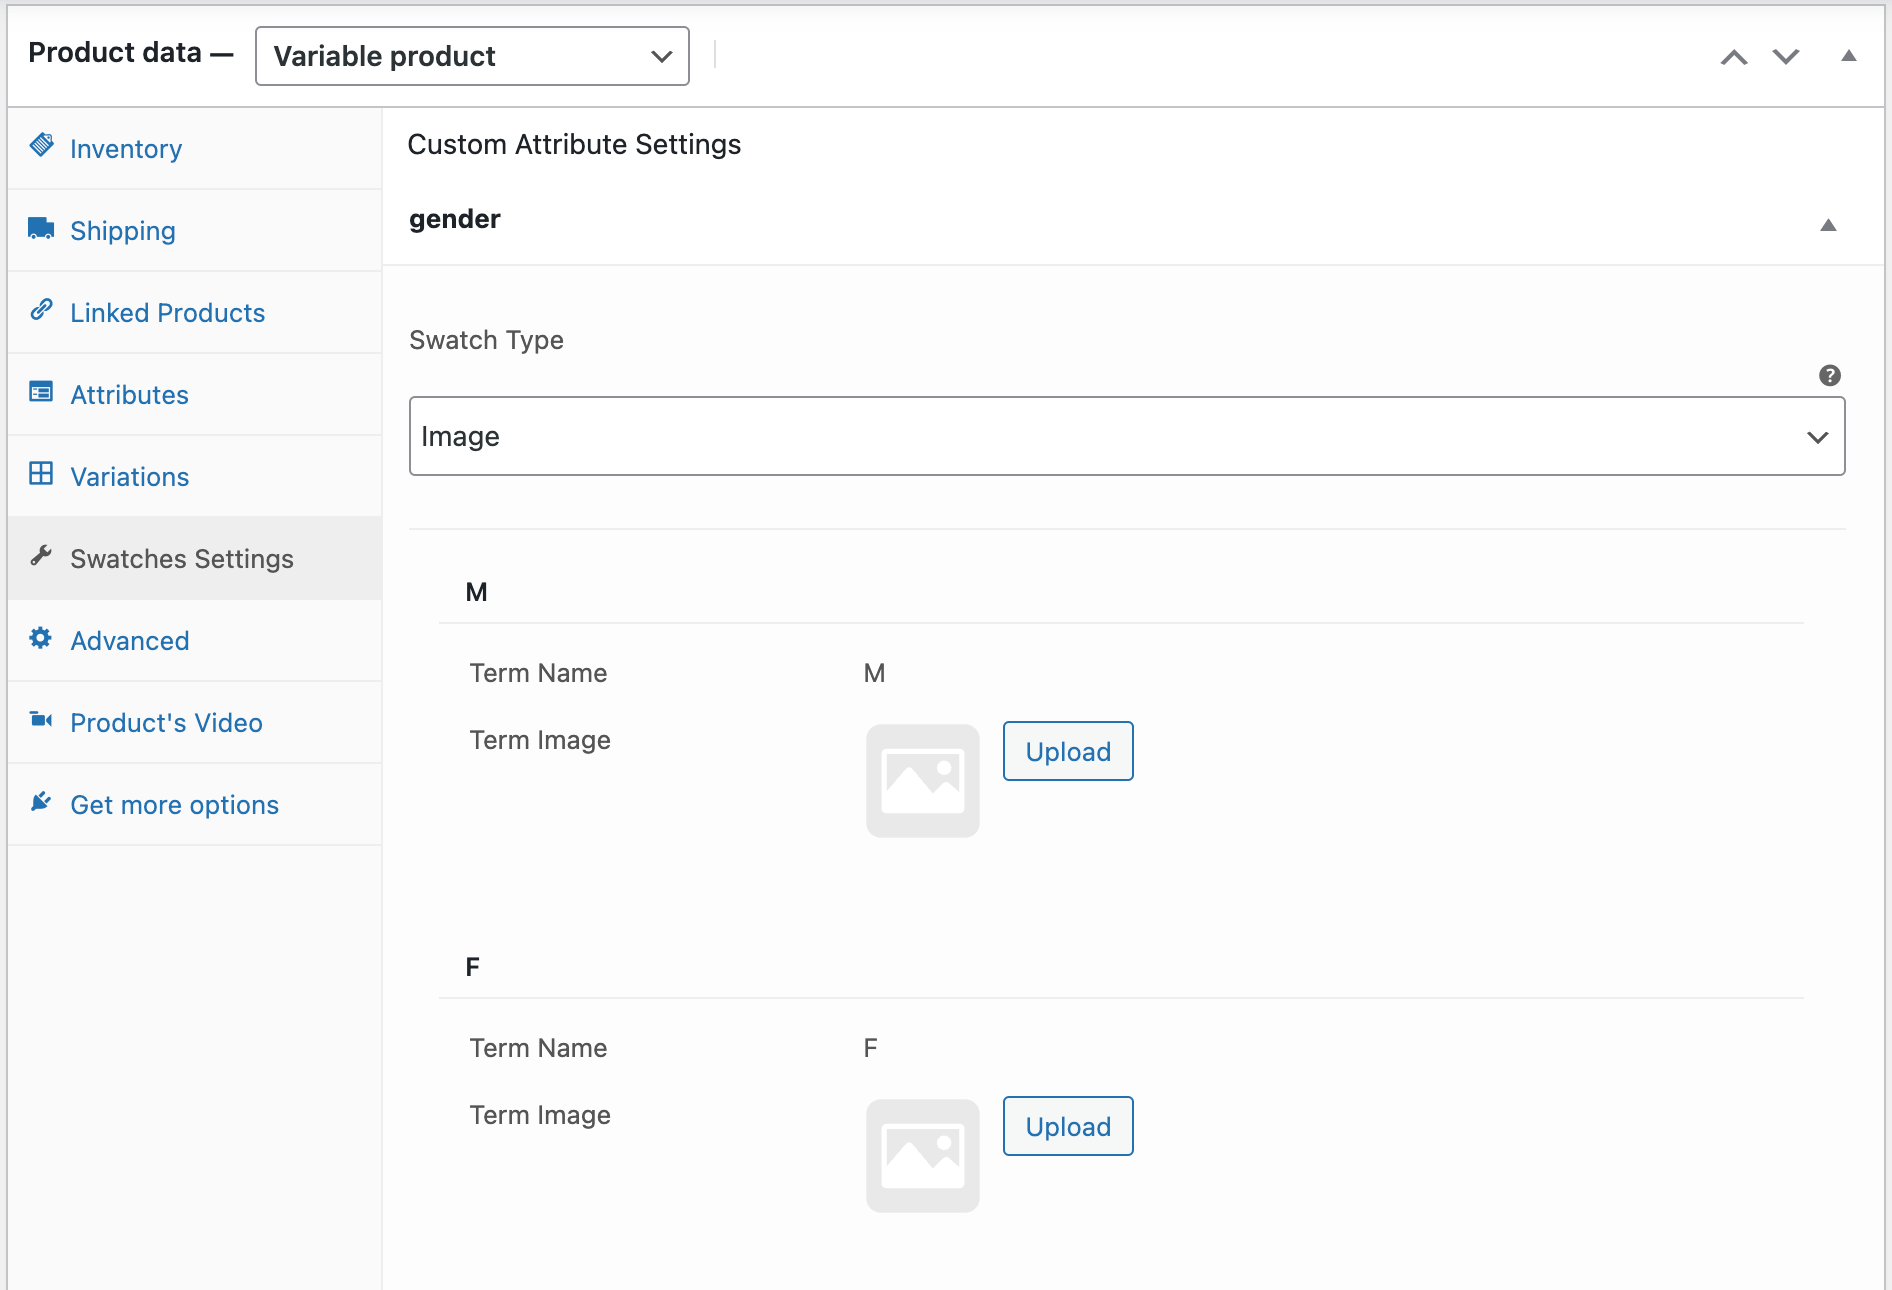
WooCommerce Variation Swatches Image Type
You can use images for your variations by choosing the swatch image type.
As you can see in the screenshot below, you can upload your desired image for every value to be displayed on the single product page.
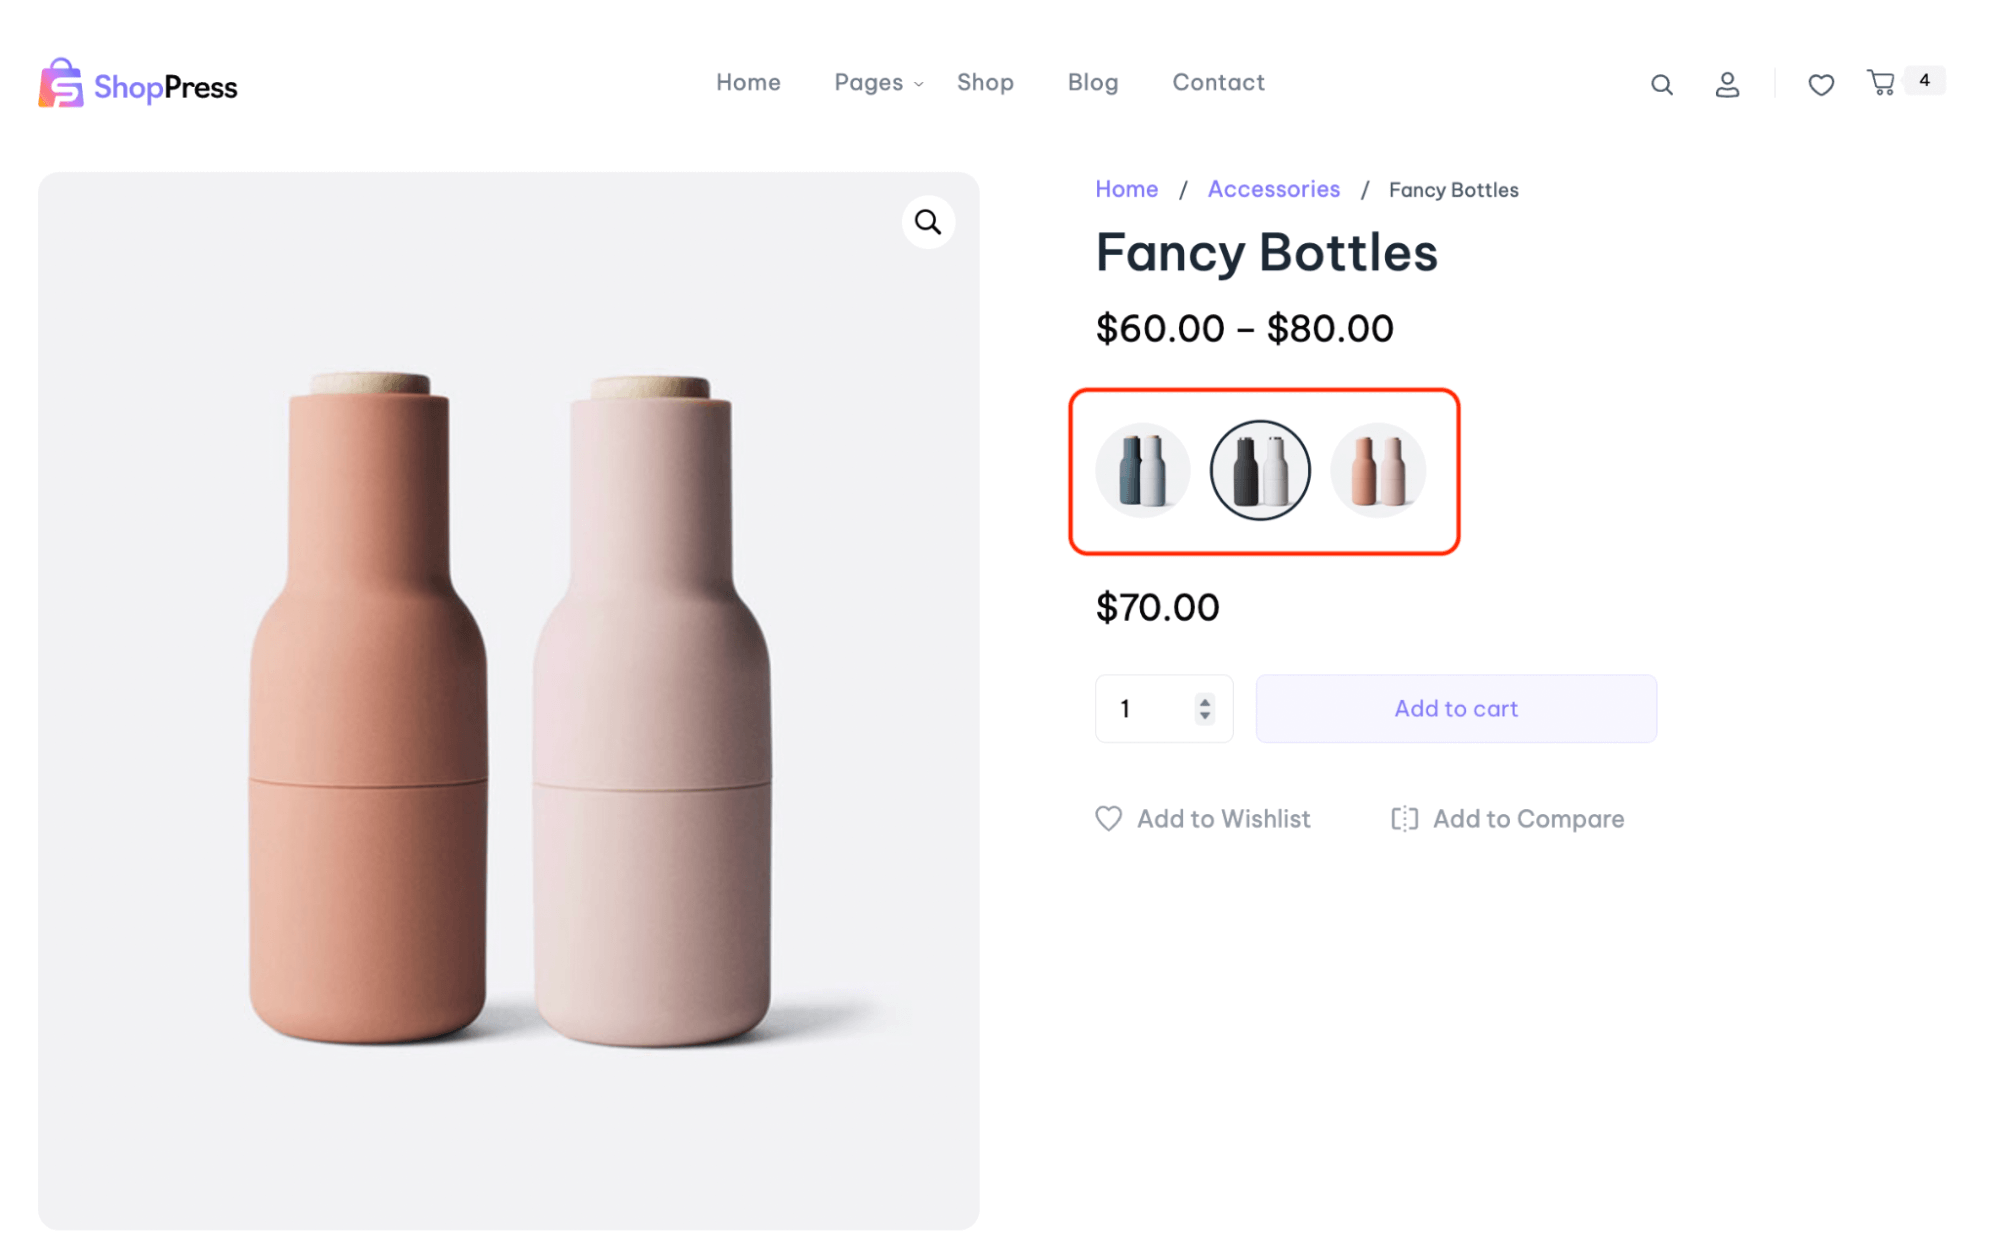
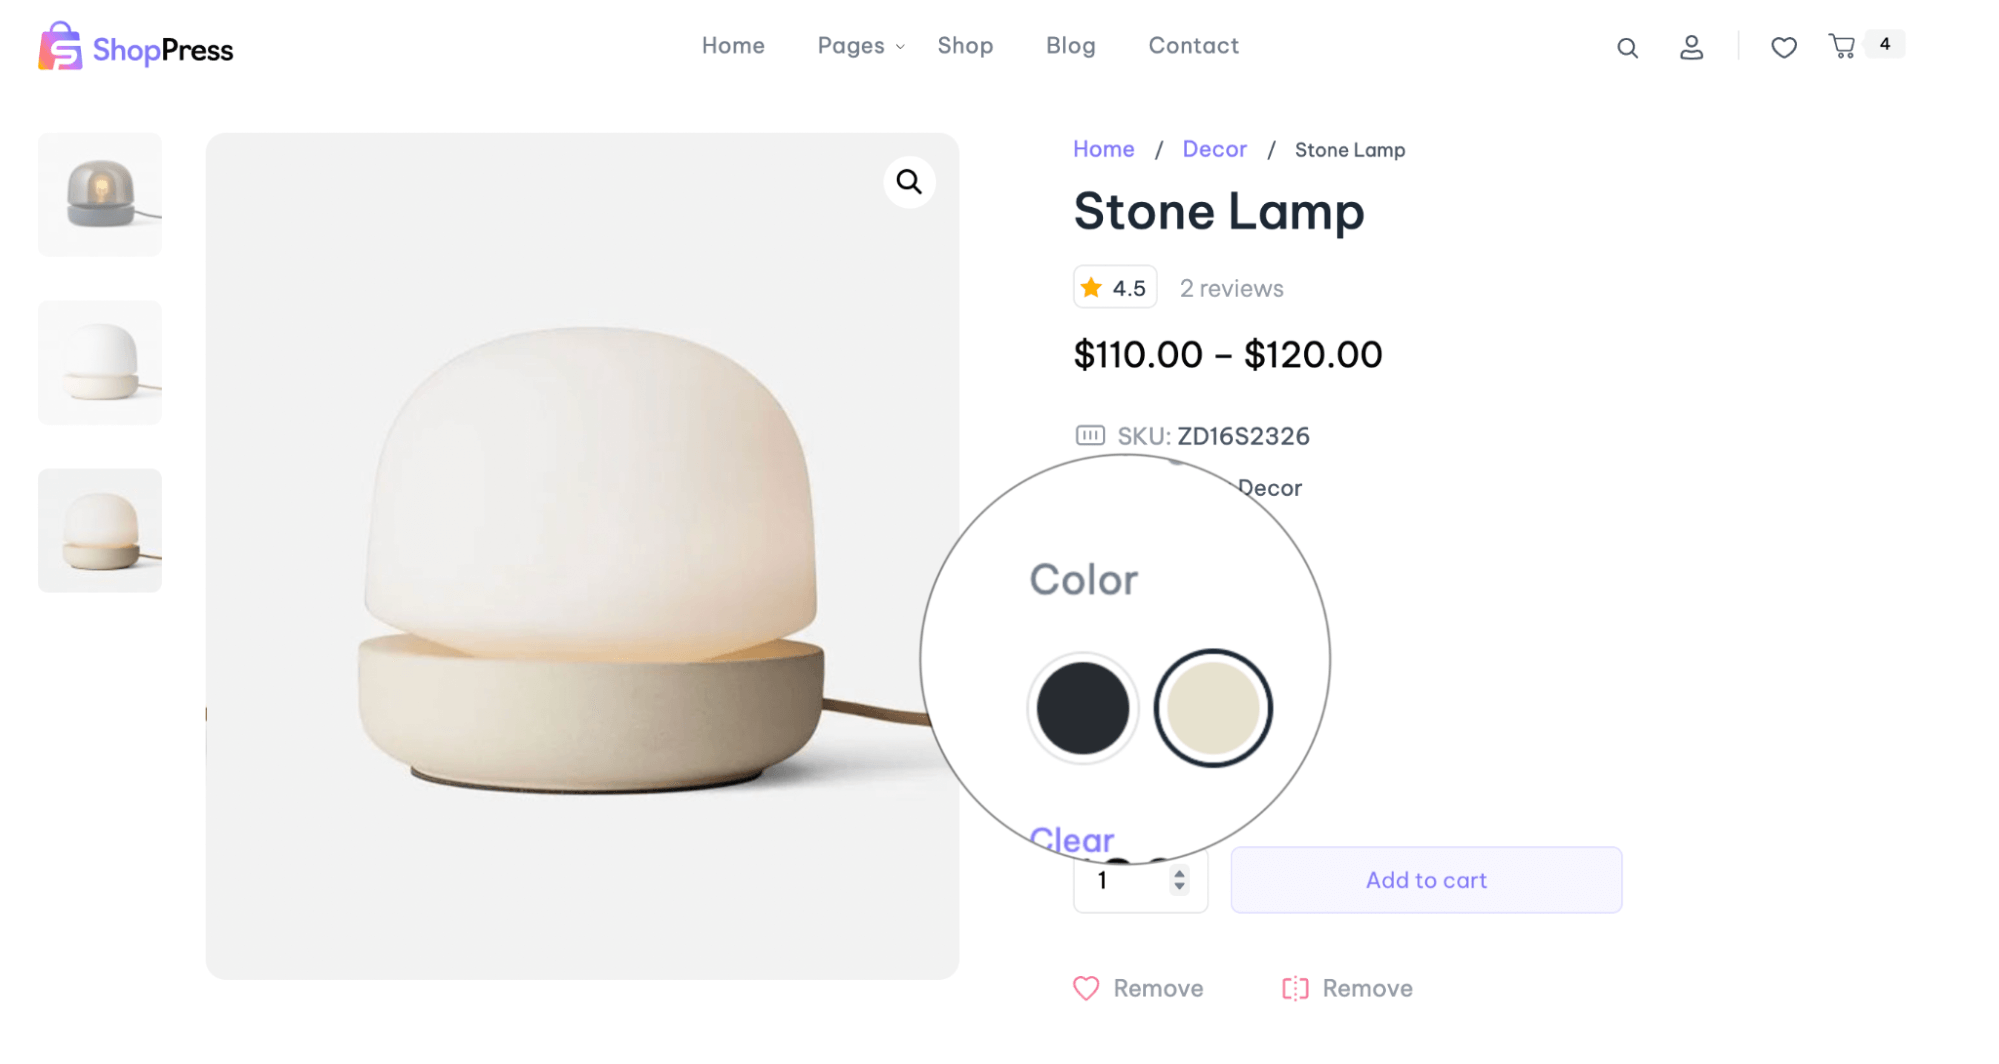
Finally, update your product page and you can see the swatch has been applied to the product on the single product page.
Practical Solutions
How to Add Color Variations in WooCommerce Products?
Through the ShopPress plugin, you can define individual colors for each type of your product.
For example, for a t-shirt that comes in various colors, you can showcase your preferred colors to the end user.
To achieve this, follow the steps below:
- Start by navigating to the ShopPress menu.
- Enable the “WooCommerce Variation Swatches” module from the Modules section.
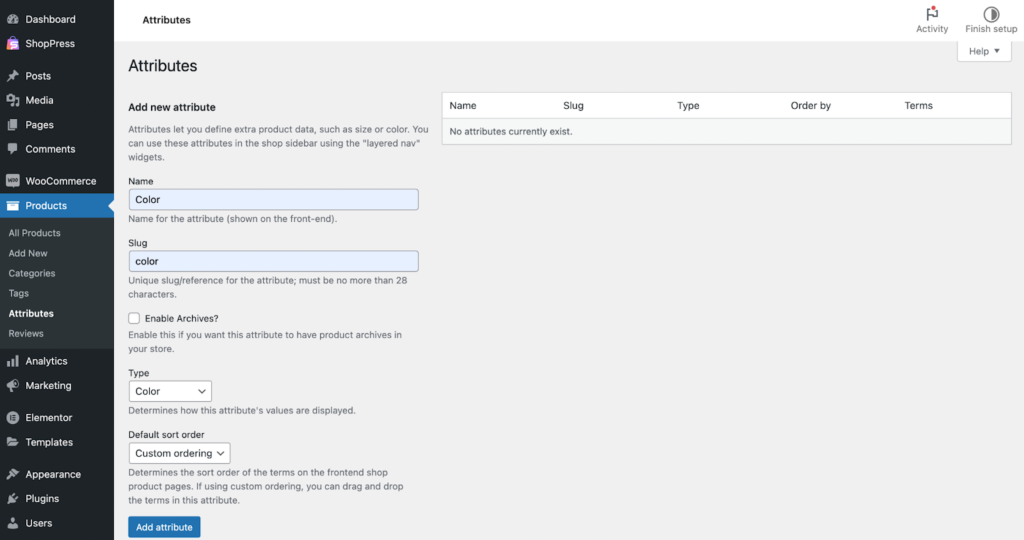
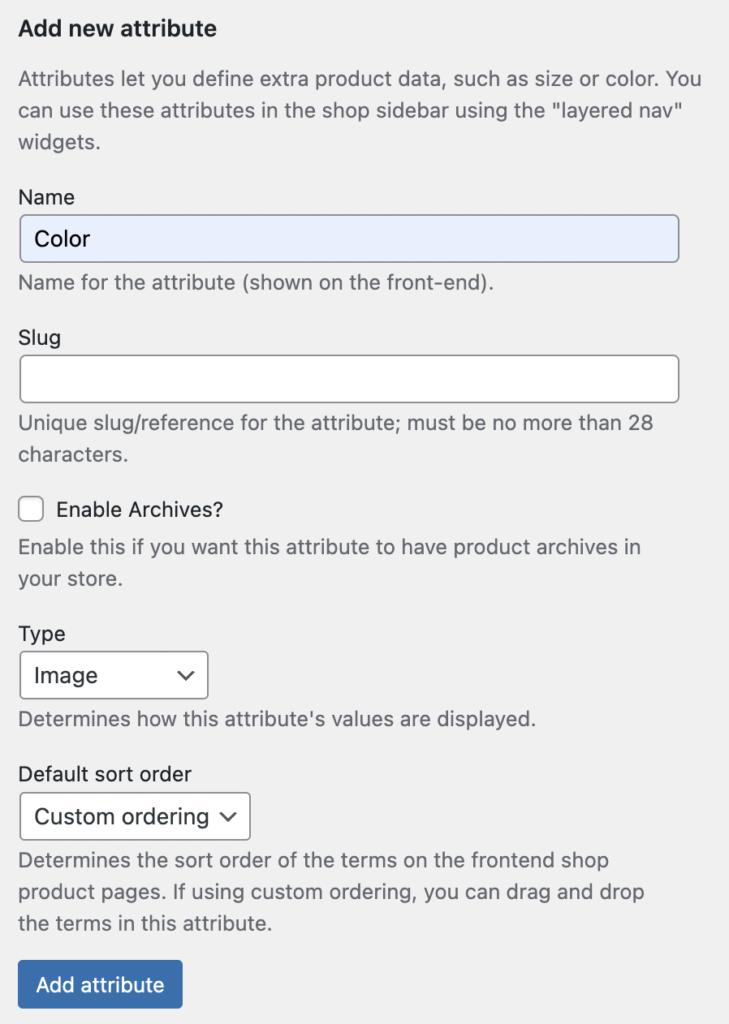
- Proceed to the WordPress menu and go to Products > Attributes.
- Create a new attribute named “Color.”
- In the Type field, input “Color,” and click on the “Add attribute” button.
These steps will enable you to set up color variations for your products using the ShopPress plugin.
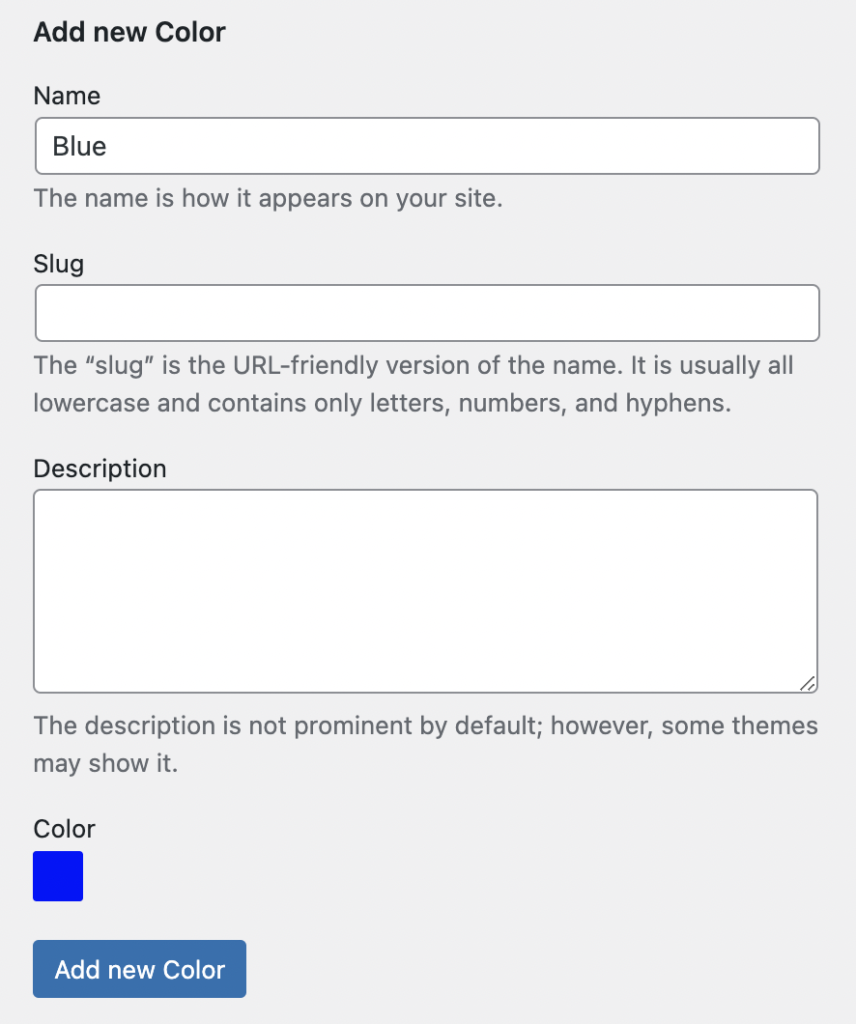
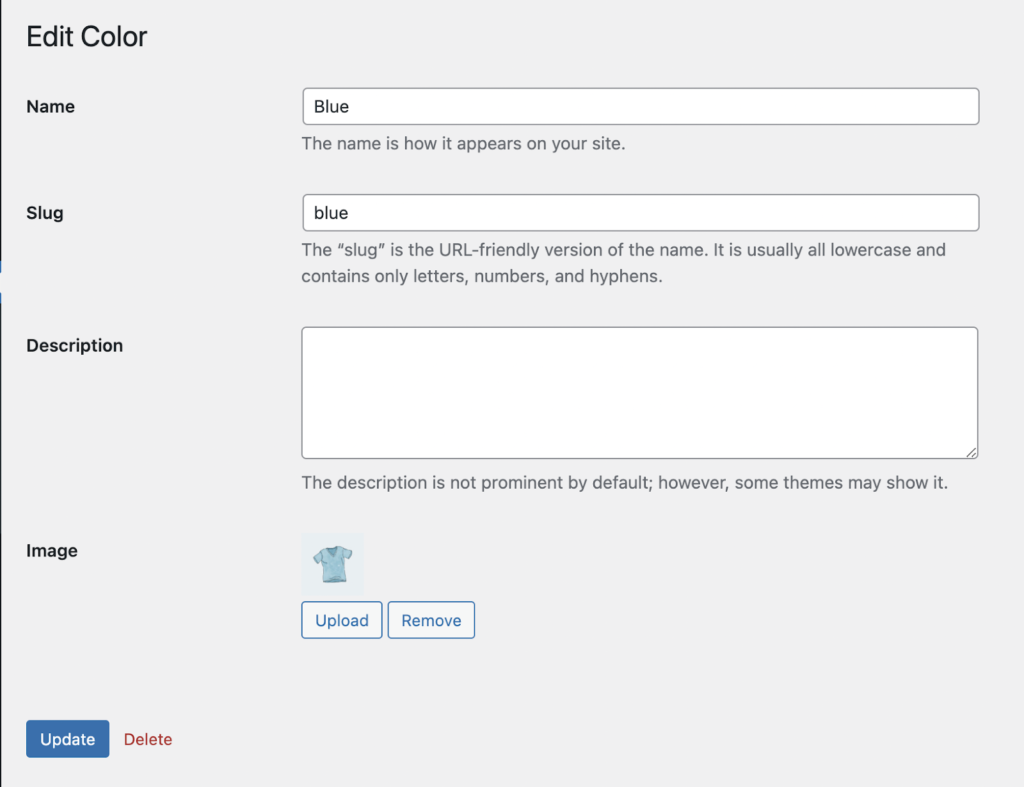
Now under the Terms tab, click on Configure Terms.

Here you can select countless colors for your products. Just select the name and the HEX code and click on Add New Color.
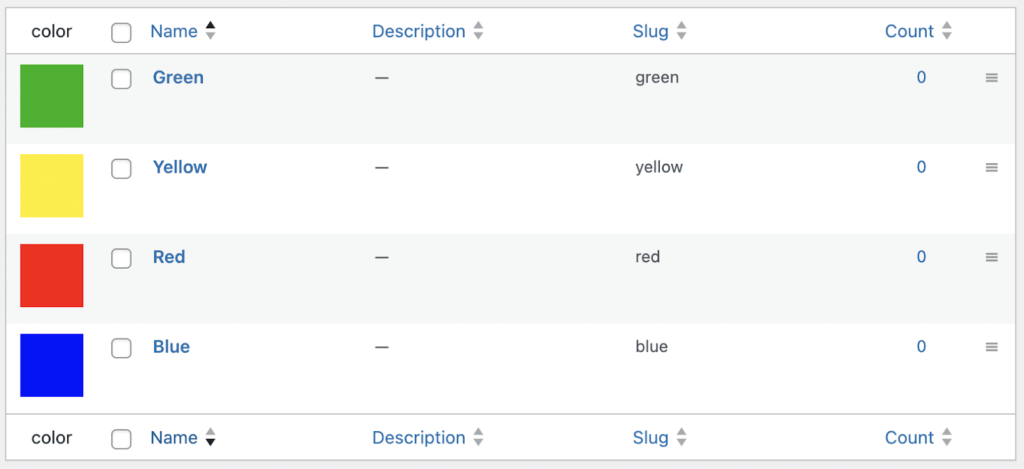
The selected colors can now be found in the Attributes menu.
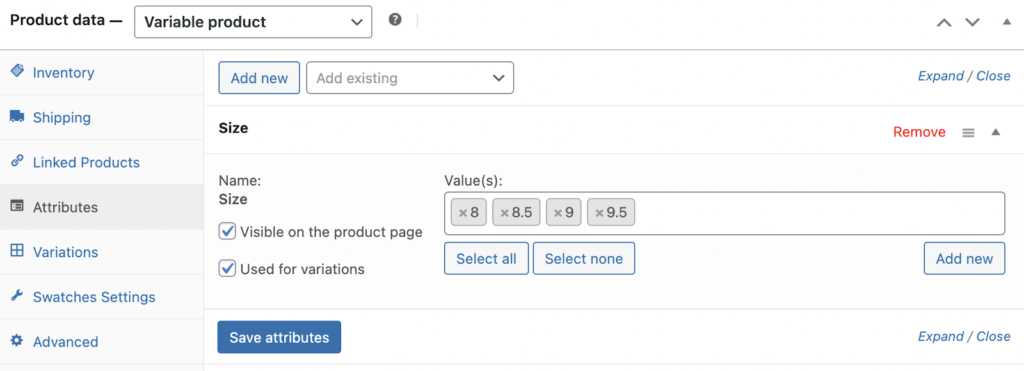
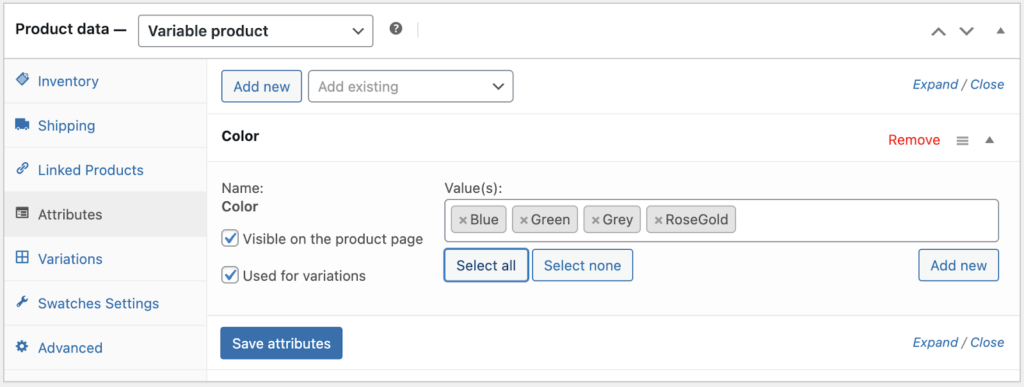
- Navigate to the product page to which you intend to add colors and select ‘Variable Product‘ from the ‘Product Data‘ tab.
- In the subsequent step, choose the color attribute that you have previously added.
- Select the desired colors for your product in the ‘Value‘ section, and finally, click the ‘Save Attributes‘ button.

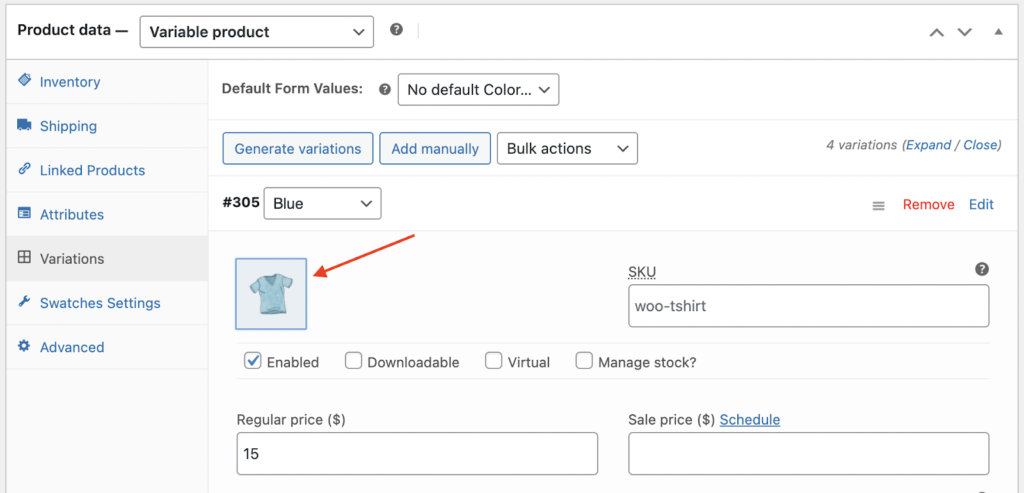
Now, from the Variations menu, you have the option to add all (by clicking on the ‘Regenerate Variations‘ button) or a specific number (by clicking on ‘Add Manually‘) of your desired colors to the product.
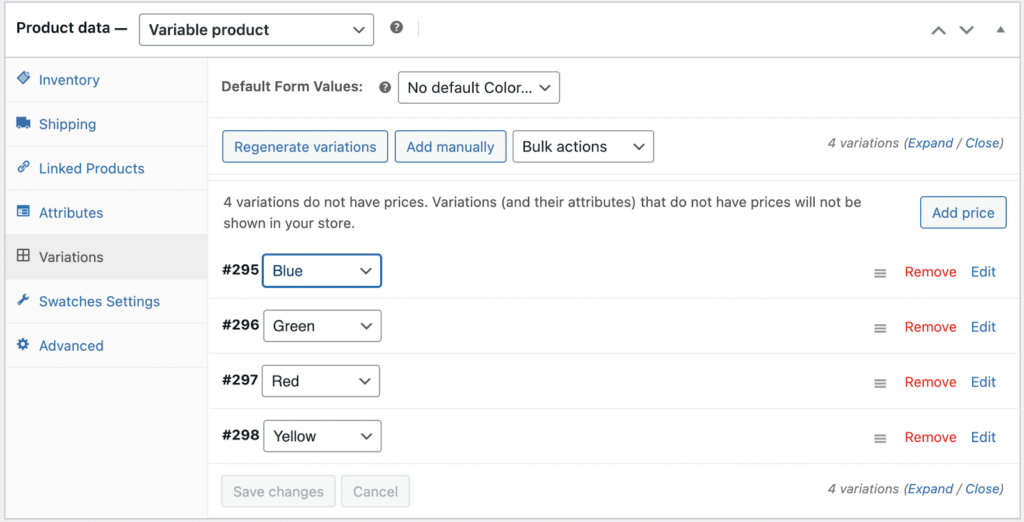
Note: Please ensure that you have defined a price for each variation and that it is in stock to display that variation.
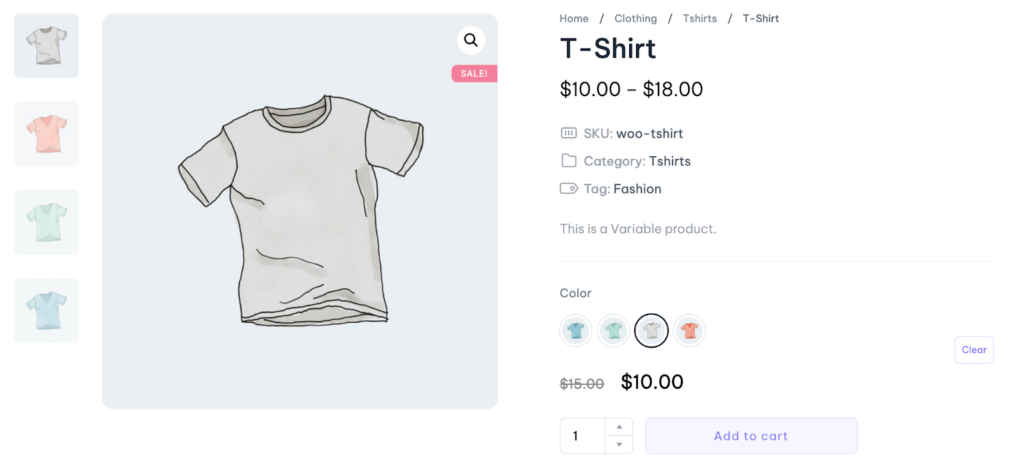
Now, refresh the page once, and you will observe that the colors are displayed on the frontend section of your website.
How Can I Sell Shoes in Different Sizes in WooCommerce?
For selling shoes or any other product with different sizes, we follow a similar process as outlined above, with the difference that, during the attribute definition step, we use ‘Button/Label‘ instead of typing the color’s name.
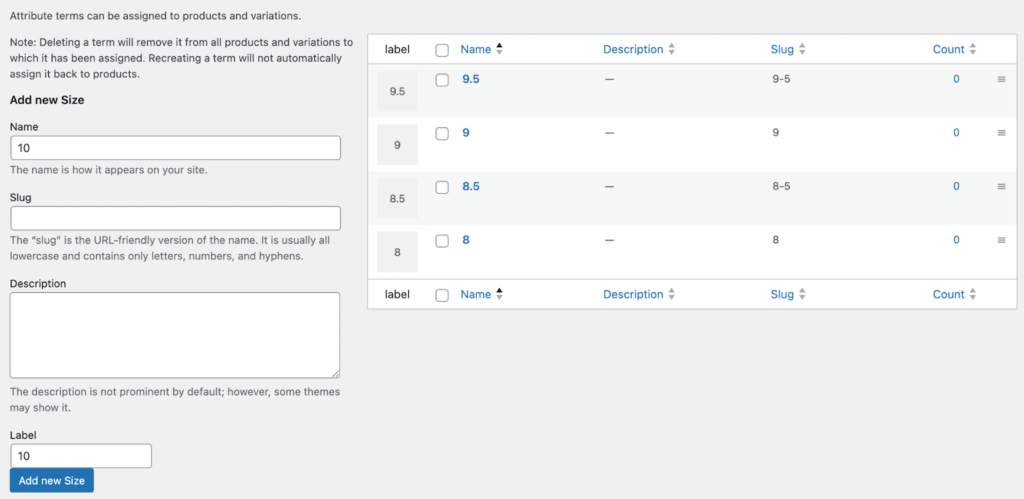
Next, add all the desired sizes to the ‘Configure terms‘ section.
Now, similar to colors, you can add all (by clicking on the ‘Regenerate Variations‘ button) or a specific number (by clicking on ‘Add Manually‘) of your desired sizes to the product from the Variations menu.
Note: Please ensure that you have defined a price for each variation and that it is in stock to display that variation.
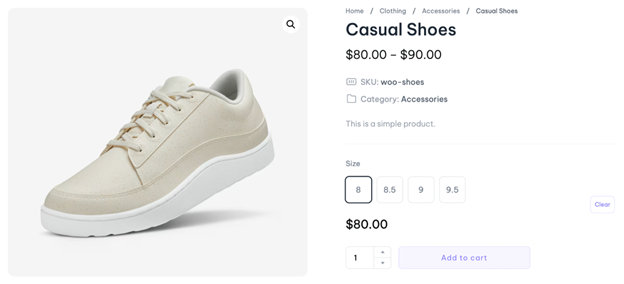
Now, refresh the page once, and you will observe that the sizes are displayed as buttons on the frontend of your website.
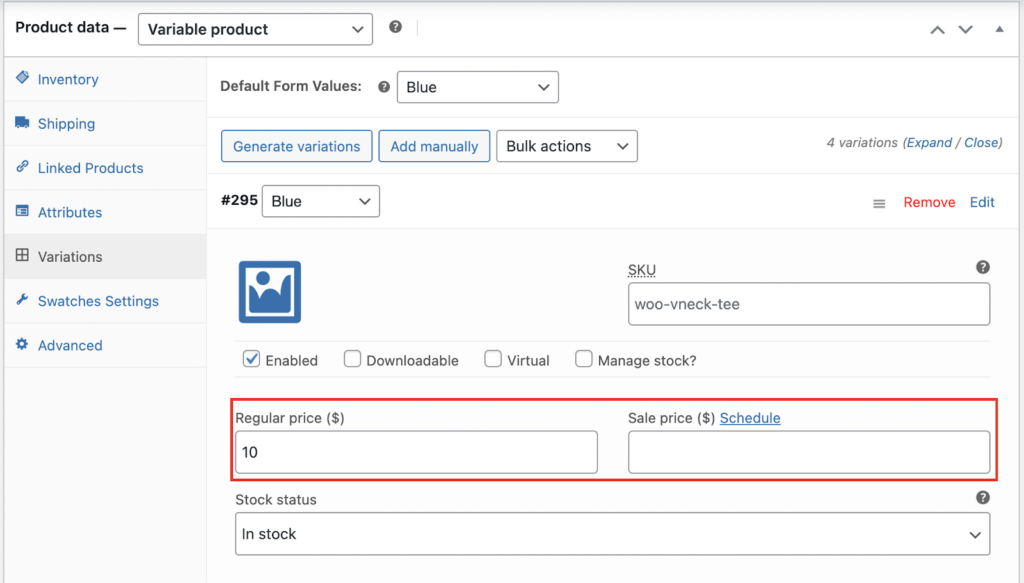
How Can I Define an Individual Price for Each Color or Variation?
To define an individual price for each color or variation of a product, follow these steps:
- After defining the colors on the Products > Attributes page, proceed to the product editing page.
- Navigate to the ‘Product Data‘ tab and enter the ‘Attributes‘ menu.
- Add your desired colors (similar to question number 1).
- From the ‘Variations‘ menu, add all (by clicking on the ‘Regenerate Variations‘ button) or a specific number (by clicking on ‘Add Manually‘) of your desired colors to the product.
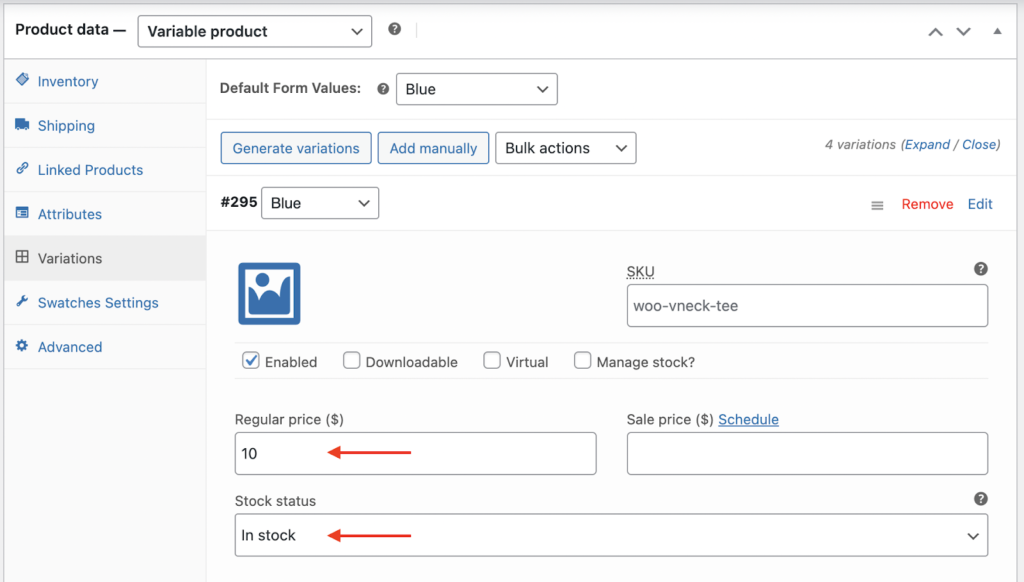
- By clicking on each Variation, you can now customize the price for that specific Variation (in this case, color).
Is It Possible to Add Separate Images for Each Color?
To define a separate image for each product, as with the previous methods, you first need to add each image as an attribute on the Products > Attributes page.
In this example, we are defining a separate image for each color of the product. On the Products > Attributes page, choose ‘Image‘ as the attribute type.
Now, add all the desired images for your product to the ‘Configure terms‘ section.
In this way, you add all the images for various colors of the product.
Now, go to the product page to which you want to add the images and select ‘Variable Product‘ from the ‘Product Data‘ tab.
In the next step, choose the image attribute that you have previously added.
Add the desired images for your product in the ‘Value‘ section, and finally, click the ‘Save Attributes‘ button.
Now, from the Variations menu, you can add all (by clicking on the ‘Regenerate Variations‘ button) or a specific number (by clicking on ‘Add Manually‘) of your desired images to the product.
Then, by clicking on each image variation, you can customize the image for that specific variation.
Note: Please ensure that you have defined a price for each variation and that it is in stock to display that variation.
Now, refresh the page once, and you will observe that the images are displayed on the frontend of your website.
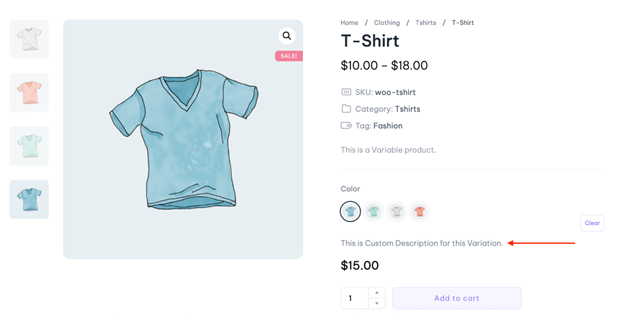
How Can I Add Descriptions for Each Variation?
To define separate descriptions for each color or specific variation of a product, follow these steps:
- After defining the colors on the Attributes page, go to the product editing page.
- In the ‘Variable Products‘ tab, after adding your desired colors, navigate from the ‘Attributes‘ menu to the ‘Variations‘ menu.
- By clicking on each specific variation of the product, you can enter the desired description for that variation in the ‘Description‘ section.
This way, you can provide unique descriptions for each color or variation of your product.
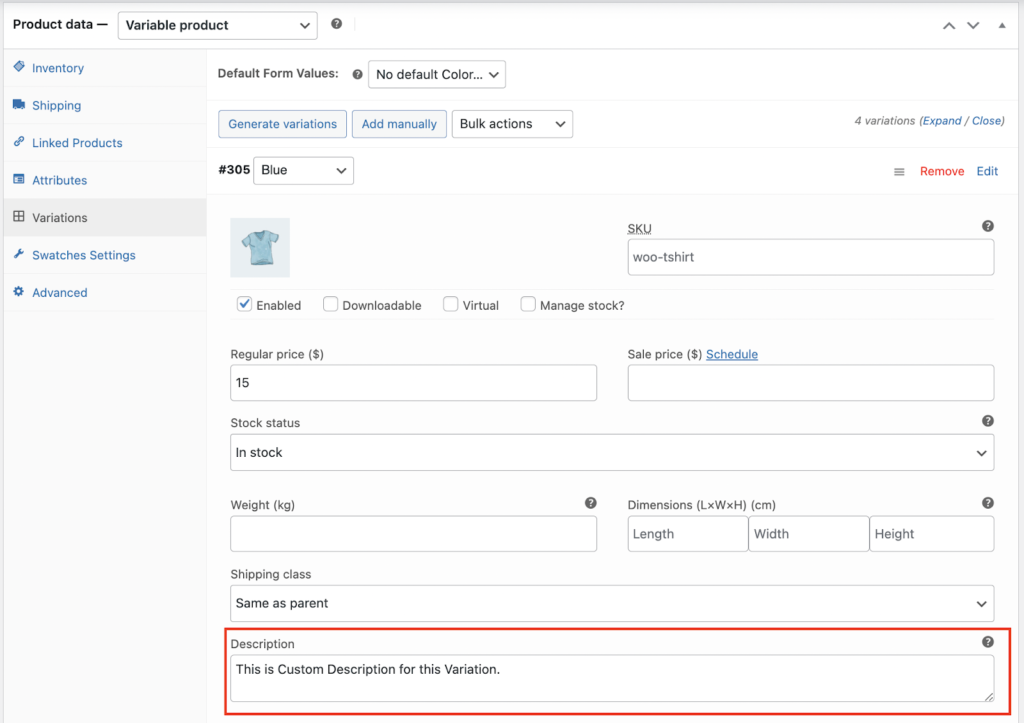
Now, on the product page, you will see that a description has been added to the specific variation.
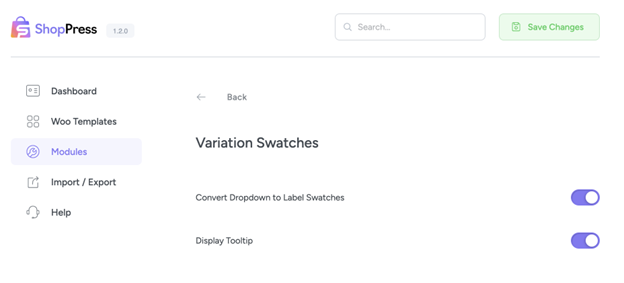
How to Turn the Default WooCommerce Variation Swatches Into Buttons?
The default display of variations in WooCommerce is in dropdown menus.
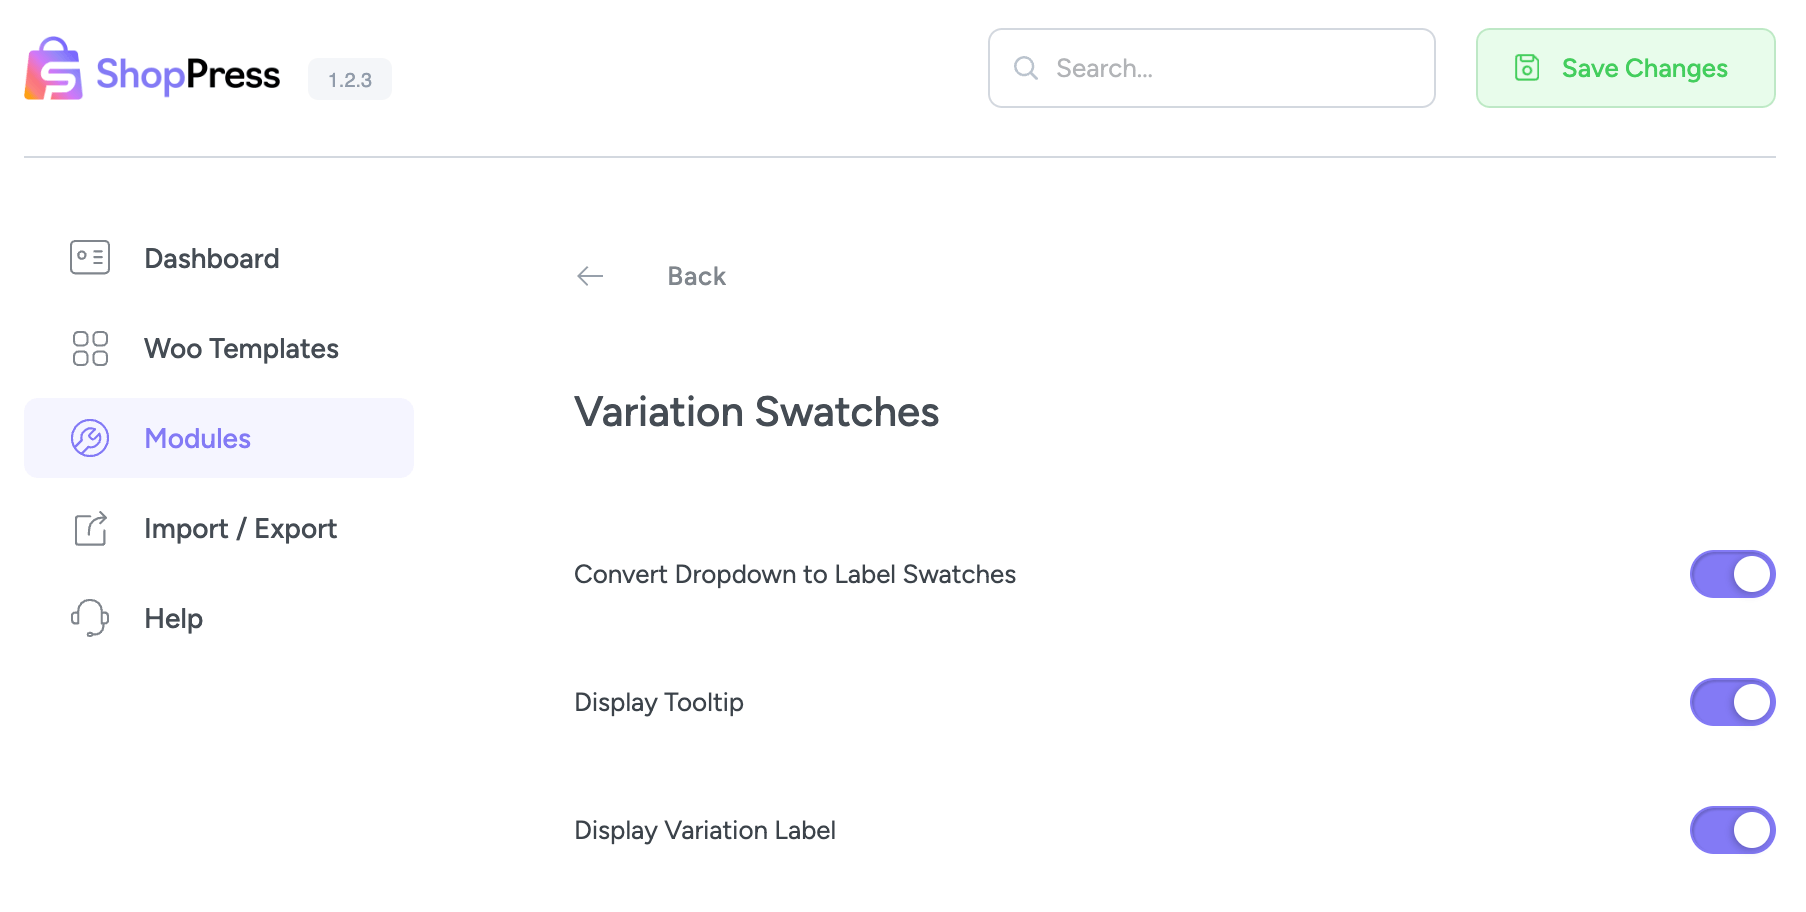
To alter this behavior, navigate to the ShopPress menu and activate the “Convert Dropdown to Label Swatches” option under the Modules section.
This will transform all dropdowns into buttons or labels for display.
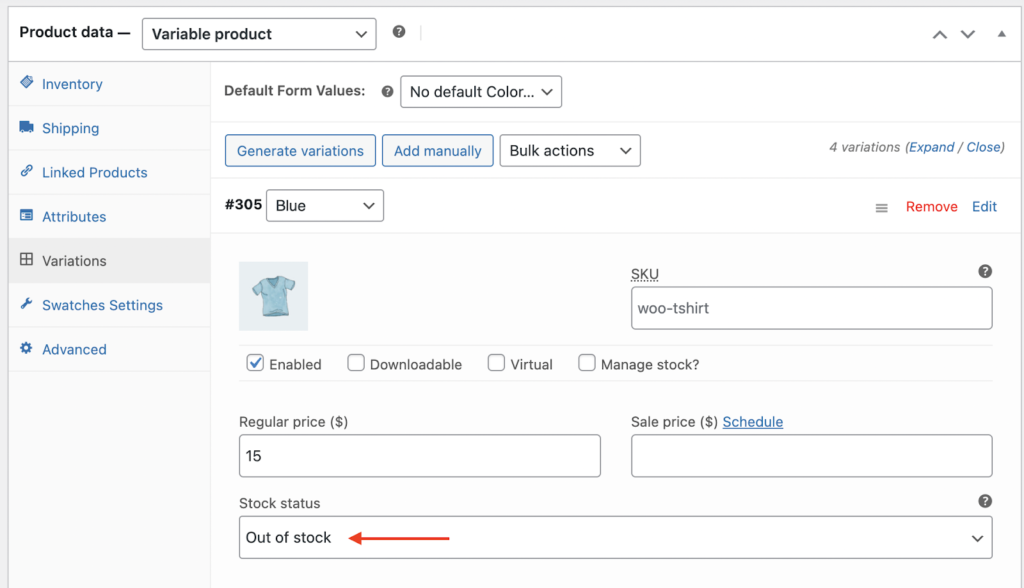
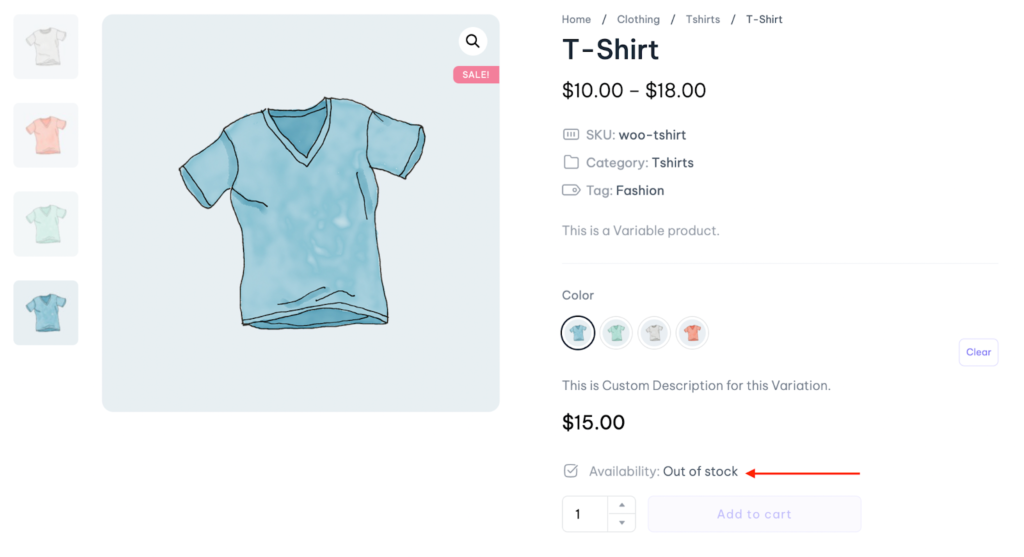
How to Display the Unavailability of A Variation Swatch?
In online stores, a specific variation of a product may encounter unavailability.
To prevent the purchase of such unavailable variations and ensure that users cannot order a product that is out of stock, you can follow these steps:
- Navigate to the product editing page.
- In the “Variable Products” section, go to the “Variations” menu.
- Click on the specific variation you wish to modify.
- In the inventory settings, select the “Out of Stock” option.
Now, this particular variation of the product becomes unavailable for purchase, and users cannot place orders for it.